|
|
PBP Commentary |
Coming up we have a heavyweight MMA rules bout between Kenny Barnes (ranked 0 p4p, 0 weight class) and Yuba Boulwiha (ranked 0 p4p, 0 weight class). These two fighters really are very evenly matched on the feet - it will be fascinating to see who can assert themselves in that aspect of the fight.
 |
|
 |
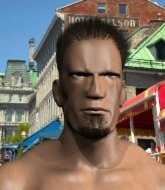
| 192 cm
27
240 lbs
5 - 4 - 0 |
|
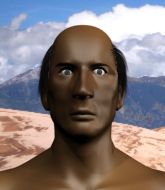
185 cm
26
275 lbs
10 - 4 - 0 |
Decent wrestler
Good kicks
Cardio machine |
|
Powerful takedowns
Basic striking
Granite chin |
|
| |
|
Ladies and gentlemen. This fight is 3 rounds, in the heavyweight division.
Introducing the fighter to my left, fighting out of the red corner.
With a record of
5 - 4 - 0, fighting out of The Island, Kenny Barnes!
And introducing the fighter to my right, fighting out of the blue corner.
With a record of
10 - 4 - 0, fighting out of The Island, Yuba Boulwiha!
The judges for this bout are Sandra Marshall, Santiago Holmes and Daniel Franklin.

The bell rings for round one and we are underway!
Horrible takedown by Boulwiha or perhaps it was just good defense by Barnes which made him look bad.
Boulwiha shoots in for a takedown - he's clinched up with Barnes but Barnes pushes him off and we're back to square one.
Boulwiha checks the leg kick.
Barnes throws a hook but Boulwiha blocks it.
Boulwiha darts in looking for a takedown but Barnes gets double underhooks and turns Boulwiha into the cage.
Kenny Barnes has stuffed three takedown attempts in the round now. That's going to take a lot out of Yuba Boulwiha.
Barnes stops a takedown attempt from Boulwiha.
Boulwiha tries to jump guard but he falls flat on his backside. Barnes smiles and moves away.
Boulwiha looks for a takedown here. Will he get it? Barnes is fending him off so far but Boulwiha persists. Nope, Barnes circles away and we're back to standing.
Boulwiha is trying hard to land a takedown here. Barnes sprawls well and keeps this one on the feet.
Barnes definitely looks more muscular than last time we saw him fight.
Boulwiha looks for a takedown but Barnes sprawls well.
Boulwiha shoots in for a takedown but doesn't get it.
Boulwiha checks a leg kick.
Boulwiha ducks under a wild hook from Barnes.
Boulwiha's coach down at was telling us pre-fight that they have been working on Boulwiha's balance. Obviously they view that as a key factor in the outcome of this fight.
A telegraphed takedown attempt from Boulwiha is defended easily by Barnes.

That's one minute gone in the round.
Boulwiha has a takedown stuffed.
Boulwiha uses some good footwork to avoid the body shot by Barnes.
Barnes throws a head kick that misses and slips in the process. He scrambles back to his feet and the fighters circle.
Good work by Boulwiha as he checks the leg kick.
Boulwiha shoots in for a takedown - he's clinched up with Barnes but Barnes pushes him off and we're back to square one.
Boulwiha misses with a takedown attempt - Barnes sprawls well and throws a nice strike on the way out which just misses.
No luck for Boulwiha with that takedown attempt.
Boulwiha shoots in looking for a takedown. Barnes tries to sprawl out of it but Boulwiha keeps driving through. The fighters are pinned against the cage. Barnes manages to get underhooks and after a bit of a struggle, circles away and we're back to standing.
Boulwiha shoots in with a takedown attempt and he has Barnes pinned against the cage. Barnes gets the underhooks and manages to circle away.

That's two minutes gone in the round.
Boulwiha avoids the head kick by Barnes.
Yuba Boulwiha seems to be the more aggressive standup fighter in this bout.
Boulwiha dives in and grabs Barnes's left leg, looking for a takedown. Barnes pushes down on Boulwiha's head and hops out.
Barnes fakes low and throws an overhand right that catches Boulwiha on the side of the head.
Boulwiha with a poor takedown
and Barnes counters with a nice jab to the body that keeps Boulwiha thinking.
Barnes displays good takedown defense there as he swats away a double leg from Boulwiha.
Barnes looks to score with a jab to the body but Boulwiha is just out of range.
Boulwiha shoots for a takedown but Barnes saw that one coming a mile off and avoided it easily.
Boulwiha fails with a takedown attempt from distance.
Barnes pulls out of a head kick attempt.
This has been an exciting period of action!
Barnes defends well against a solid takedown attempt from Boulwiha.
Boulwiha shoots in for a takedown but doesn't get it.
Barnes looks to score with a jab to the body but Boulwiha is just out of range.

That's three minutes gone in the round.
Boulwiha shoots for a takedown but Barnes saw that one coming a mile off and avoided it easily.
Barnes darts in and out, connecting with a jab.
Barnes displays good takedown defense there as he swats away a double leg from Boulwiha.
Some bone on bone action there as Boulwiha checks a low kick. Luckily it wasn't a particularly hard one.
Boulwiha closes the distance and clinches up with Barnes, looking for a takedown. Boulwiha pushes Barnes against the cage but Barnes circles to the side and manages to break the clinch.
Boulwiha shoots in looking for a takedown. Barnes tries to sprawl out of it but Boulwiha keeps driving through. The fighters are pinned against the cage. Barnes manages to get underhooks and after a bit of a struggle, circles away and we're back to standing.
Boulwiha shoots for a takedown but Barnes saw that one coming a mile off and avoided it easily.
Barnes displays good takedown defense there as he swats away a double leg from Boulwiha.
Boulwiha fails with a takedown attempt from distance.
Boulwiha throws a looping left and ducks down for a takedown. He's got his arms around Barnes's waist but Barnes gets an underhook and avoids the takedown by throwing Boulwiha off to one side.
Boulwiha on the wrong end of a nice low kick. He's acting like it's no big deal but he doesn't want to take many more of those.
Kenny Barnes is looking to keep the fight on the feet at all costs.
Barnes tries a head kick but it misses.
Boulwiha tries for a takedown but Barnes sees it coming a mile off and avoids it easily.

That's four minutes gone in the round.
Barnes tries to score with a leg kick but it misses it's target.
Barnes leaves Boulwiha with his face pressed against the mat as he sprawls beautifully, defending against a solid takedown attempt.
Boulwiha fails to land the takedown.
Boulwiha looks winded!
Barnes slaps away a takedown attempt from Boulwiha, before circling back to the center of the mat.
The crowd cheering loudly, showing their appreciation for the quality fight we're seeing here.
Boulwiha fails with a rather predictable takedown attempt.
Boulwiha slips a straight right by Barnes.
Boulwiha keeping a good distance there, avoiding the body shot.
Barnes misses with a wild body shot.
As the round comes to an end the crowd are showing their appreciation for a great round of action.
Boulwiha shoots in for a takedown but doesn't get it.
A nice inside leg kick there by Barnes. That's going to slow Boulwiha down.
Barnes is looking to wear down Boulwiha with body shots, infact he's throwing more body shots than head shots at the moment.
Boulwiha fails with a takedown attempt from distance.
Boulwiha shoots in looking for a takedown. Barnes tries to sprawl out of it but Boulwiha keeps driving through. The fighters are pinned against the cage. Barnes manages to get underhooks and after a bit of a struggle, circles away and we're back to standing.
And that�s the end of the round � the fighters go back to their corners.
Kenny Barnes dominated that round.
Well, the break between rounds is over. Let's get back to the scrappin!

Barnes throws a right and a left that both miss.
Boulwiha dives in and grabs Barnes's left leg, looking for a takedown. Barnes pushes down on Boulwiha's head and hops out.
It really doesn't seem like the step up in weight is hurting Barnes here at all. He's more than holding his own against the bigger man.

Boulwiha dives in and scores a takedown into Barnes's guard.
Boulwiha tries to free his leg and advance position but Barnes is retaining full guard.
Barnes trying to keep a closed guard but Boulwiha is proving a slippery customer.
Barnes is working an open guard here, looking to improve his position. No doubt that will leave him open to counters but at least he's being more offensive.
Boulwiha wants to pass the guard but Barnes is keeping the position.
Boulwiha throws a big right hand that misses.
That's one minute gone in the round.
Boulwiha passes Barnes's left leg - he's now in half guard.
Barnes is controlling Boulwiha's position as best he can from this difficult position.
Boulwiha with the ground and pound but Barnes uses the opportunity to regain guard.
The ref warns both fighters not to hold the cage as they work up against the meshing.
Boulwiha postures up in Barnes's guard and throws a big left but Barnes blocks it.
Boulwiha wants to control from the top but Barnes keeps moving.
Barnes keeping full guard, as Boulwiha tries to pass.
The fighters are pressed up against the cage, both looking to find a bit of space to work.
Boulwiha has the superior BJJ but he's also working some ground strikes into his gameplan.
That's two minutes gone in the round.

Boulwiha drops back, looking for a kneebar! Barnes looks panicked! The fighters roll across the mat, one looking to finish, one looking to escape. Barnes looks to have wriggled free... Yes, he's got his leg free and he's dived into side control! Good work there from Barnes!
Barnes is looking to take a break and control but Boulwiha is keeping him honest, looking to work from the bottom.
Boulwiha is sneaking out the side here. He's bucked Barnes off and has taken his back!
Barnes is keeping busy.
That's three minutes gone in the round.
Boulwiha is working really hard to secure the rear naked choke. Barnes defends successfully for a significant amount of time. Both fighters are looking very determined.
Barnes takes a big shot to the side of the head.
Barnes avoids the strikes from Boulwiha.
We've seen a great period of action over the last minute or so - credit to both fighters for going all out!
Barnes holding both Boulwiha 's hands and preventing any damage.
Boulwiha scores with punches to the body.
Barnes has his hands over his head blocking the strikes from Boulwiha.
Yuba Boulwiha has got the better of the ground game so far.
That's four minutes gone in the round.
Boulwiha sinks in the hooks and is looking for the choke. He's got it! Barnes taps out!
Ladies and gentlemen, after 4:23 of round 2, we have a winner by way of Submission (RNC). Yuba Boulwiha!
A very excited looking Yuba Boulwiha rambled incoherently for about 5 minutes post fight about how awesome he is. It was kinda funny for a while but then everyone got annoyed.
|
|
|
|
|
|
|
|
|
|
|
|
|
|
|
|
|
|
|
|
|
|
|
| S |
C
A |
G |
S |
C
B |
G |
|
S |
C |
G |
|
energy
A | B |
|
hype
A | B |
|
pop
A | B |
|
mgr
A | B |
|
FIGHT
RATING
37% |
|
|
|
|
|
|
