|
|
PBP Commentary |
Coming up we have a bantamweight MMA rules bout between Twiggy BigBranch (ranked 0 p4p, 0 weight class) and Haywood Badger (ranked 0 p4p, 0 weight class). Well, the cameraman is lingering on a pretty young lady for a bit too long there. Keep your eyes on the prize buddy or you'll miss the fighter intros!
 |
|
 |
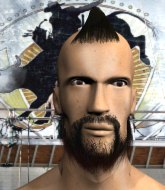
| 169 cm
25
142 lbs
8 - 0 - 0 |
|
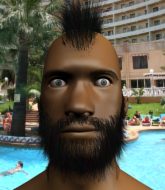
161 cm
27
134 lbs
8 - 1 - 0 |
Good wrestling
Excellent boxer
Cardio machine |
|
Olympic wrestler
Lethal high kicks
Granite chin |
|
| |
|
Ladies and gentlemen. This fight is 5 rounds, for the bantamweight championship of the world!
Introducing the champion to my left, fighting out of the red corner.
With a record of
8 - 0 - 0, fighting out of Amsterdam, Twiggy BigBranch!
And introducing the challenger to my right, fighting out of the blue corner.
With a record of
8 - 1 - 0, fighting out of Las Vegas, Haywood Badger!
The judges for this bout are Gwen Towbar, Frank Dennis and Tiny Johnson.

The bell rings for round one and we are underway!
BigBranch lands a beauty of a right hand that gets the crowd cheering.
Badger swings for the body but BigBranch moves out of range.
Good standup being displayed there by Badger as he connects with a hook.
Badger checks a low kick from BigBranch.
BigBranch has been working on his boxing with his coaches at Humboldt Park Elite Gym in the buildup to the fight.
Badger throws a low kick but it's checked well by BigBranch.
An attempted straight right counter from BigBranch misses the target.
Nice cross by Badger.
Well, he's not going to score with shots like that. A lazy body kick attempt from Badger.
BigBranch rushes in with a sloppy looking punch
and Badger counters with an outside leg kick.
Badger thumps BigBranch with a low kick.
Badger tries to land with a swinging hook to the body but BigBranch was well out of range. Poor timing from Badger.
BigBranch attempts a leg kick but it's missed by a good margin.
BigBranch attempts a low kick but it misses it's target.
Badger flicks out a counter leg kick but BigBranch steps away.
Badger works BigBranch's body with a nice hook.
BigBranch swings and misses with a shot to the body
and Badger counters with a straight right hand.
Badger has been spending a lot of time sparring his boxing in the run up to the fight, trying to sharpen up those hands and look for a knockout.
This is a great period of action - very entertaining stuff!
BigBranch just misses with a punch to the body.
BigBranch throws a hard body shot but it just misses.
Badger lands a nice hook to BigBranch's body. BigBranch takes it in his stride and looks to land his own strikes.

That's one minute gone in the round.
BigBranch ducks down and throws a hook to the body but Badger moves away.
A decent looking body kick lands there for Badger.
Badger lands a leg kick that knocks BigBranch off balance momentarily.
Badger scores with a sloppy right hand. BigBranch should have avoided that one.
Badger keeping a good distance there, avoiding the body shot.
BigBranch has a nice red mark on his side after a thudding body kick by Badger.
Badger is looking to land body kicks.
BigBranch throws a body punch but Badger moves out of range.
Badger throws a body kick that sends a sickening thudding noise reverberating around the arena.
Badger throws a quick inside leg kick.
BigBranch lands a leg kick and bounces back out of range.
Badger throws a lazy right hand but BigBranch sees it coming a mile off and sidesteps it easily.
Badger swings and misses with a hook to the body.
Badger fakes a head shot and lands one to the body.
We've seen a great period of action over the last minute or so - credit to both fighters for going all out!
BigBranch attempts a low kick but it misses it's target.

That's two minutes gone in the round.
BigBranch's hands are dropping dangerously low here and Badger connects clean with a right hook that sends him down to one knee! BigBranch scrambles back to his feet.
Badger throws a body shot but no joy.
BigBranch scores with a big left there. The judges will like that one.
BigBranch misses with a left hand
and Badger counters with a nice body kick.
BigBranch attempts a leg kick but it's missed by a good margin.
BigBranch is looking to wear down Badger with body shots, infact he's throwing more body shots than head shots at the moment.
Badger connects with a leg kick. He turned his hip over nicely there.
BigBranch blocks a jab.
BigBranch takes a punch right to his stomach. That took the wind out of him momentarily.
A telegraphed right hand from Badger misses the target.
BigBranch fakes a jab and then connects with a hook.
Badger fakes with the hands and throws a leg kick but BigBranch is out of range.
BigBranch attempts a low kick but it misses it's target.
Badger changes levels for a counter takedown but doesn't follow through with his attempt.
A solid leg kick lands there for Badger.
BigBranch throws a lazy right hand but Badger sees it coming a mile off and sidesteps it easily.
BigBranch fails with the takedown.
Badger was about to counter that last move with a leg kick but changes his mind.

That's three minutes gone in the round.
An inside leg kick from Badger misses.
Badger defending well as BigBranch loads up on a big left hand.
Badger tried to score with a low kick but BigBranch checks it.
BigBranch feinted there with a counter leg kick.
Badger looks to score with a jab to the body but BigBranch is just out of range.
Badger blocks a jab.
It seemed like Badger was going to counter with the hook but didn't fully commit to it.
No luck with that takedown attempt from BigBranch.
Badger is clearly trying to counter these attacks from BigBranch with a body shot.
BigBranch takes a really solid shot there but just smiles back and shrugs his shoulders.
BigBranch shapes like he's going to throw a leg kick but settles back down.
Badger blocks a jab.
A low kick from Badger misses
and BigBranch counters with a nice leg kick.
Badger throws the kick towards the body but BigBranch avoids it.
BigBranch thinks about countering with a body kick.
Badger fakes a jab and then connects with a hook.

That's four minutes gone in the round.
BigBranch with a nice looking leg kick. You could hear that one land in a back row.
Badger misses with a double jab.
Badger lands a powerful looking uppercut that connected with his opponent's jaw.
An inside leg kick lands from Badger.
This is a great period of action - very entertaining stuff!
Badger wants to land a leg kick but BigBranch is out of range.
Badger checks a low kick. Bone on bone - not my idea of a good time.
It seemed like Badger was going to counter with the hook but didn't fully commit to it.
Badger throws a hook but BigBranch blocks it.
BigBranch throws an overhand right that lands on Badger's shoulder, as Badger tries to avoid the shot.
It seemed like Badger was going to counter with the hook but didn't fully commit to it.
BigBranch avoids the body shot from Badger.
BigBranch throws a hook but Badger blocks it.
The crowd cheers as Badger lands an impressive looking overhand right. BigBranch doesn't seem phased though.
BigBranch darts in looking for a takedown but Badger gets double underhooks and turns BigBranch into the cage.
That's three failed takedown attempts in the round for Twiggy BigBranch. That's going to take a lot out of him.
BigBranch lands a jab to the nose.
BigBranch looking to take his opponent's legs away with the low kicks.
And that�s the end of the round � the fighters go back to their corners.
Haywood Badger dominated that round.
That's the end of the interval. I'm sure that seemed a lot quicker than a minute for our two fighters! Back to the action.

BigBranch with a nice looking leg kick. You could hear that one land in a back row.
Badger takes a body punch that cleary hurt but he's trying not to show any weakness.
Badger has been the more effective fighter overall so far.
BigBranch throws a shot from downtown. Badger moves away and avoids it.
Badger rushes in with a sloppy looking punch
and BigBranch counters with a straight right hand.
Badger throws a low kick but BigBranch moves out of range easily.
BigBranch throws an ugly left hook that misses

and Badger counters with a takedown into side control.
BigBranch prevents Badger from moving into mount.

Badger is looking for a kimura. He might have it! No, BigBranch has escaped the position, nice work there.
The fighters are pressed up against the cage, both looking to find a bit of space to work.
Badger wants to lay and pray for a moment but BigBranch keeps working.
Badger in side control, throwing shots but BigBranch defends.
That's one minute gone in the round.
Badger taking a breather here.
The fighters are starting to perspire pretty heavily.
Badger is trying to move to mount but BigBranch reverses beautifully and ends up in Badger's guard.
That's two minutes gone in the round.
A lull in the action here being met with boos from the crowd.
Badger is trying to keep BigBranch in close.
Badger has a loose triangle. He'll be looking to tighten that up but BigBranch can see exactly what he's planning and manages to posture up and free himself.
Badger looking to control.
The ref warns both fighters not to hold the cage as they work up against the meshing.
BigBranch with a couple of shots to the head there. Not particularly brutal.
That's three minutes gone in the round.
BigBranch trying to control the position from guard on top but Badger is wriggling around, looking for whatever he can.
BigBranch content to strike from guard, landing some decent shots.
BigBranch trying to pass the guard but can't manage it just yet.
Badger had isolated an arm as going for a kimura. BigBranch defends it easily.
Badger controls BigBranch momentarily but BigBranch frees himself.
Badger working the defensive guard well to avoid strikes from BigBranch.

The referee has decided to stand the fighters back up, so we'll restart on the feet.
BigBranch tries a switch kick but it misses it's target.
That's four minutes gone in the round.
The crowd are starting to boo a lack of action.
BigBranch works the jab nicely.
BigBranch defending well as Badger loads up on a big left hand.
Good leg kick by BigBranch there. It's the ones that make that thud noise that hurt and that was an almighty thud.
Badger lands a really nice looking cross but BigBranch seems unphased.
Badger thows a body kick. BigBranch tries to catch it but that hurt him.
Badger lands a nice hook to BigBranch's body. BigBranch takes it in his stride and looks to land his own strikes.
BigBranch motions for Badger to come forward. BigBranch throws a leg kick but it misses it's target.
Badger connects with a lovely jab that went straight through the gap between BigBranch's hands.
BigBranch avoids a lazy jab quite easily.
BigBranch thuds a left hand into Badger's body.
BigBranch walks into a left hand.
The crowd thankful this round is nearly over.
Badger checks a leg kick.
Oooooooooooh, not good. A low kick from BigBranch lands where it shouldn't have, right in the... well, you know what he did? He kicked him in the penis. He's injured, injured bad. The referee sends both fighters to their corners and Badger has 5 minutes to recover. He's OK now though... a thumbs up from Badger and we're back underway with a touch of gloves.
And Badger tries to counter it with a takedown but BigBranch pushes his down on his head and steps out.
Good exchange - Badger coming out on top.
Badger throws a body kick that sends a sickening thudding noise reverberating around the arena.
And that�s the end of the round � the fighters go back to their corners.
A close second round but Haywood Badger will probably get the nod - 10:9.
That's the end of the round. The referee orders the cornermen out of the cage so we can get back down to business.

BigBranch misses with a head kick.
A little jabbing left from Badger on the counter but it doesn't find it's target.
BigBranch throws a leg kick but Badger moved away.
A telegraphed right hand from Badger misses the target.
BigBranch half commits to a counter takedown before pushing away, out of range.
BigBranch fakes a couple of low kicks, before throwing one on the third attempt. It connects and Badger has to reset his feet before getting ready to engage.
Badger jabs BigBranch to the body, keeping him at a distance.
Badger tries to land a leg kick but BigBranch saw it coming and moves away.
Badger moves away from the strike by BigBranch.
It seemed like Badger was going to counter with the hook but didn't fully commit to it.
Badger delivers a nice body kick.
BigBranch walks into a jab.
Badger throws a low kick but his opponent is out of range.
We've had a slow start to the round here - hopefully the action picks up.
Badger looks to score with a jab to the body but BigBranch is just out of range.
BigBranch fakes the leg kick and cracks Badger in the body.
Badger missing with a left hand there. BigBranch was out of range so wasted energy throwing that one.
Badger lands a straight punch to the body, keeping BigBranch at a distance.
Badger misses with a straight right.
That's one minute gone in the round.
BigBranch waving his hands out in front of him, looking to distract Badger.
BigBranch will be looking to protect his midsection after taking some solid kicks to the body.
Badger checks a leg kick.
Badger is looking to score with low kicks.
BigBranch changes levels looking for a counter takedown but doesn't commit.
BigBranch looks for a takedown but Badger sprawls well.
BigBranch walks forward, straight into a front kick from Badger.
BigBranch moves out of range as Badger strikes.
BigBranch lands a lovely overhand right.
Boom, another hit is landed. "You're gunna get knocked out" taunts BigBranch, as that shot connected.
BigBranch wants to land a leg kick but Badger is out of range.
BigBranch pulls out of a head kick attempt.
Nice body punch from BigBranch.
That's two minutes gone in the round.
Badger lands a leg kick that knocks BigBranch off balance momentarily.
BigBranch avoids the head kick by Badger.
Badger misses with a low kick.
Badger throws an uppercut from half a mile away. BigBranch sees it coming and avoids it easily.
BigBranch throws out a loose jab but Badger uses good head movement to avoid it.
Badger shapes like he's going to throw a leg kick but settles back down.
Badger rushes in with a sloppy looking punch
and BigBranch connects with a straight left hand counter down the middle.
The crowd cheering loudly, showing their appreciation for the quality fight we're seeing here.
Badger connects with a lovely right hand, straight down the pipe.
Badger misses with an uppercut. BigBranch saw that one coming.
BigBranch tried to counter with a leg kick but Badger avoided it.
BigBranch throws a looping overhand right but Badger ducks down to avoid it.
Badger throws a series of punches but BigBranch moves out of range.
BigBranch slips under a jab.
BigBranch half commits to a counter takedown before pushing away, out of range.
BigBranch throws a leg kick that misses.
BigBranch scores with a crisp jab that stopped Badger in his tracks.
That's three minutes gone in the round.
Nice uppercut there from BigBranch.
Badger misses with a low kick.
BigBranch moves away from the strike by Badger.
Badger misses with a hook.
BigBranch lands with a nice body punch.
A good leg kick by Badger.
Badger lands with a nice low kick. That'll leave a bruise.
Badger throws a leg kick which misses BigBranch's front leg but catches the back leg as BigBranch tries to avoid it.
Nice uppercut lands for Badger. That snapped BigBranch's head back.
Badger thows a body kick. BigBranch tries to catch it but that hurt him.
BigBranch takes a thudding leg kick, right into the meat of the thigh.
BigBranch uses good footwork to get in and out and land a nice right hand before Badger has time to react.
Badger throws a hook to the body but it doesn't connect.
The crowd are loving this. Great action here.
That kick from BigBranch tenderised Badger's leg. Badger is trying to keep his angry face on.
That's four minutes gone in the round.
BigBranch takes a jab on the nose there. A little bit of blood seems to be coming out. Hopefully that won't affect his breathing.
BigBranch throws a leg kick that is checked
and Badger cracks him with a counter punch right on the button.
BigBranch throws a hook to the body but it doesn't connect.
BigBranch lands with a nice low kick. That'll leave a bruise.
BigBranch throws a nice outside leg kick.
Haywood Badger seems to be getting the better of the standup.
BigBranch misses with a body shot.
Badger thinks about the counter body kick.
Badger scores with a jab.
Nice shot by BigBranch.
Badger moves out of range as BigBranch strikes.
BigBranch throws a combination but comes up with nothing but fresh air.
Badger scores with the left hand. BigBranch knows he should have avoided that one.
Badger lands a leg kick that knocks BigBranch off balance momentarily.
BigBranch throws a body shot but no joy.
And that�s the end of the round � the fighters go back to their corners.
A close third round but Haywood Badger just about did enough to take it.
Well, the break between rounds is over. Let's get back to the scrappin!

Badger throws out a powerful jab.
Badger lands with a nice low kick. That'll leave a bruise.
A leg kick checked by BigBranch.
Badger's leg has a nasty welt from taking a succession of leg kicks. That must be slowing him down.
Badger avoids the body shot from BigBranch.
Badger throws out a loose jab but BigBranch uses good head movement to avoid it.
Badger scores with a jab.
A nice inside leg kick there by Badger. That's going to slow BigBranch down.
This fight brought to you by 5M nutrition - it's mmmmm tasty. Nice jab by BigBranch.
Badger walks straight into an uppercut. Luckily it didn't land flush.
The fighters circle momentarily. BigBranch darts into range and connects with a nice straight punch.
Badger staying out of range there.
BigBranch throws out a loose jab but Badger uses good head movement to avoid it.
Badger is looking to chop away at BigBranch's legs.
BigBranch tried to score with a low kick but Badger checks it.
That's one minute gone in the round.
Badger throws a chopping leg kick but BigBranch manages to avoid taking any serious damage.
BigBranch tries to land with a swinging hook to the body but Badger was well out of range. Poor timing from BigBranch.
And an attempted straight right on the counter from Badger! But no joy.
Badger checks the leg kick nicely there.
Badger flicks out a counter leg kick but BigBranch steps away.
BigBranch looks like he's developed a pretty tasty lump over his left eye. He'll need to avoid taking much more damage to that.
Badger throws a jab to the body, straight down the pipe. Boom. That sent BigBranch stumbling backwards but he manages to regain his composure quickly.
BigBranch misses with a low kick.
A good leg kick by Badger.
Badger misses with a hook. BigBranch ducked under it nicely.
BigBranch just misses with a punch to the body.
BigBranch throws a low kick but Badger avoids it.
Badger connects with a body shot that sends BigBranch's belly button to the back.
BigBranch dips down and scores with a jab to the body.
BigBranch avoids a low kick by using good footwork.
BigBranch is the aggressor but that punch slipped nicely by Badger.
And Badger responds with a good body kick, but BigBranch manages to step out the way in time.
BigBranch connects with a leg kick. Badger looked like he was expecting something else and didn't defend it.
That's two minutes gone in the round.
Badger throws a jab when BigBranch was well out of range.
Badger lands a beauty of a right hand that gets the crowd cheering.
Nice body kick there by Badger.
The crowd cheering loudly, showing their appreciation for the quality fight we're seeing here.
BigBranch has a nice red mark on his side after a thudding body kick by Badger.
BigBranch swings wildly with a right hand that was never going to find it's target.
Badger follows through with a counter body kick but it doesn't land.
BigBranch rushes in with a sloppy looking punch
and Badger counters with an inside leg kick.
Badger's corner calls for a 1-2. Badger obliges with the 1 part as he scores the single shot and moves back out of range.
Badger moves into range and throws a combination. A nice jab followed by a hook to the body.
BigBranch takes a hook to the side of the head. I wonder if that's got his ears ringing.
Badger throws a hook to the side of BigBranch's head but BigBranch sees it coming and ducks under it beautifully.
BigBranch looked to counter that last move with a leg kick but didn't pull the trigger.
Badger misses with a low kick.
Badger lunges at BigBranch with a hook that half lands and is half blocked by BigBranch's hand.
Badger misses with a hook. BigBranch ducked under it nicely.
That's three minutes gone in the round.
Badger is looking to slow BigBranch down with leg kicks.
Badger pushes BigBranch away with a front kick.
Badger throws a chopping leg kick but BigBranch manages to avoid taking any serious damage.
Badger throws a head kick that misses
enabling BigBranch to counter with a crisp jab.
Badger misses with a straight right.
BigBranch checks a leg kick nicely.
BigBranch digs a good hook to Badger's body.
Badger avoids a low kick by using good footwork.
Badger looks to throw the jab but BigBranch is out of range.
BigBranch lands with a nice low kick. That'll leave a bruise.
Badger sizes up BigBranch with a pawing jab and scores with a straight right down the middle.
BigBranch tried to score with a low kick but Badger checks it.
Badger looks like he wants to counter punch here.
Badger slips under a jab.
That's four minutes gone in the round.
Badger lands with a nice body kick.
Badger misses with a wild body shot.
Badger tries to work over BigBranch's front leg with a kick but BigBranch checks it.
It looked like BigBranch was trying to counter with a body shot coming off that last attack from Badger.
BigBranch throws a good cross that connects.
We've seen a great period of action over the last minute or so - credit to both fighters for going all out!
BigBranch slips under a jab.
BigBranch moves out of range of the strikes.
BigBranch throws a low kick but it's checked well by Badger.
BigBranch looks shocked there as he takes a right hand to the temple.
BigBranch throws a good cross that connects.
BigBranch chopping away at his opponent's legs.
BigBranch on the wrong end of a nice hook.
Badger throws a leg kick but BigBranch moved away.
Badger chopping away at his opponent's legs.
And that�s the end of the round � the fighters go back to their corners.
Haywood Badger dominated that fourth round.
That's time! BigBranch's corner gives him a slap on the ass as he gets ready to fight. This is the final round!

BigBranch throws a leg kick that misses.
BigBranch connects with an inside leg kick.
BigBranch shoots in for a takedown but Badger shows good takedown defense there and keeps this one on the feet.
BigBranch throws a leg kick that is checked
and Badger counters with a quick right hand to the jaw.
Badger tries to score with an inside leg kick but telegraphs it and BigBranch is able to avoid easily.
Badger throws a jab when BigBranch was well out of range.
Badger ducks down and throws a hook to the body.
BigBranch avoids the head kick by Badger.
BigBranch keeping at a good range here, avoiding a leg kick.
We've had a slow start to the round here - hopefully the action picks up.
Badger is looking to score with low kicks.
BigBranch appeared to be looking to counter that last move with a leg kick.
Badger digs a good body shot into BigBranch's ribs.
BigBranch throws a nice outside leg kick.
BigBranch misses with an uppercut.
Badger throws a body punch but BigBranch moves out of range.
That's one minute gone in the round.
Badger throws a leg kick

so BigBranch counters with a double leg into guard. Good agility.
Badger wants to control here, rather than go for any submissions from the bottom. At least for now.
Badger working a defensive guard here.
BigBranch avoids a guillotine attempt easily.
Badger is trying to control the position but BigBranch postures up.
That's two minutes gone in the round.
BigBranch trying to control the position from guard on top but Badger is wriggling around, looking for whatever he can.
BigBranch landing some decent shots from guard.
BigBranch trying to control but Badger is working from the bottom.
The referee decides to stand the fighters back up.
Haywood Badger is fighting for a decision - hopefully he's judged it right and he's actually winning the fight.
BigBranch checks a leg kick.
BigBranch tries to counter with a takedown but Badger is quick to defend against it.
Badger ducks low and lands a nice hook to the body of his opponent.
Badger stuns BigBranch with a nice body shot, before stepping back out of range.
BigBranch looking to land some kicks to the body here.
BigBranch with a nice cross.
BigBranch throws a poor cross that misses
and Badger counters with a takedown into side control! That could mean trouble for BigBranch!
The crowd are loving this. Great action here.
Badger is looking to take a break and control but BigBranch is keeping him honest, looking to work from the bottom.
That's three minutes gone in the round.
Badger taking a break here but BigBranch is having none of it and regains half guard.
That's four minutes gone in the round.
The crowd are starting to boo a lack of action.
Badger wants to control but BigBranch is keeping him busy.
Badger content to sit in half guard and control for a moment.
The referee has motioned to the fighters to stand back up. He just wasn't happy with the level of activity.
And that's the end of the fight!
Haywood Badger comfortably won the final round on my scorecard.
Well Badger has outworked and out performed his opponent in all aspects of the game today. He was simply too good and the decision should be no more than a formality. Over to the ring announcer for the scorecards.
Ladies and gentlemen, after 5 rounds of action, we go to the scorecards for a decision.
Judge Gwen Towbar scores the fight 45:50
Judge Frank Dennis scores the fight 45:50
Judge Tiny Johnson scores the fight 45:50
In favor of your winner, by unanimous decision... Haywood Badger!
Haywood Badger is the new bantamweight champion!
A very excited looking Haywood Badger made sure he remembered to thank all the fans both in the arena and on the internet. He said all the coolest people spend all day on MMA websites, which got a big reaction.
|
|
|
|
|
|
|
|
|
|
|
|
|
|
|
|
|
|
|
|
|
|
|
| S |
C
A |
G |
S |
C
B |
G |
|
S |
C |
G |
|
energy
A | B |
|
hype
A | B |
|
pop
A | B |
|
mgr
A | B |
|
FIGHT
RATING
61% |
|
|
|
|
|
|
