|
|
PBP Commentary |
Coming up we have a lightweight MMA rules bout between Jake Mendes (ranked 0 p4p, 0 weight class) and Carl Maywho (ranked 0 p4p, 0 weight class). Jake Mendes had a look across the cage there at his opponent. He definitely means business
 |
|
 |
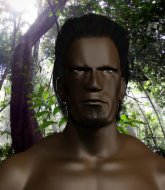
| 173 cm
32
157 lbs
13 - 14 - 0 |
|
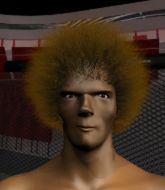
164 cm
25
160 lbs
3 - 13 - 0 |
Good wrestling
Excellent boxer
Very quick |
|
BJJ Blue Belt
Decent boxing
Solid chin |
|
| |
|
Ladies and gentlemen. This fight is 3 rounds, in the lightweight division.
Introducing the fighter to my left, fighting out of the red corner.
With a record of
13 - 14 - 0, fighting out of St Petersburg, Jake Mendes!
And introducing the fighter to my right, fighting out of the blue corner.
With a record of
3 - 13 - 0, fighting out of St Petersburg, Carl Maywho!
The judges for this bout are Dmitry Maklakov, Sergei Dronov and Vladimir Khabensky.

The bell rings for round one and we are underway!
Maywho with a poor takedown
and Mendes counters nicely by changing levels and landing a hook to the body.
Nice takedown defense from Mendes. No joy for Maywho on that attempt.
A quick step to the side and Mendes tries to counter with a shot to the body but it doesn't connect.
Mendes chopping away at his opponent's legs.
Maywho tries to clinch up against the cage, rushing in to close the distance. Mendes manages to break the clinch and circles back to the middle of the mat.
Maywho takes a shot right to the bread basket.
Maywho takes a shot right to the liver - Bas would have been proud of that punch.
Mendes looks to have improved his striking defense since last time we saw him fight.
Mendes lands a vicious shot with the stealth of a sniper and the strength of a viper. Are vipers that strong? I can think of lots of things that are stronger than a viper - not many rhyme with sniper though.
Maywho with a lazy takedown attempt
and Mendes counters with a quick right hand to the jaw.
Jake Mendes has stuffed three takedown attempts in the round now. That's going to take a lot out of Carl Maywho.
Maywho takes a body punch that cleary hurt but he's trying not to show any weakness.
Mendes works Maywho's body with a nice hook.
The crowd are loving this. Great action here.
Maywho throws a head kick that misses.
Jake Mendes seems to be the more aggressive standup fighter in this bout.
Nice shot lands for Mendes.

It looks like Carl Maywho has been cut.
Mendes with a nice looking leg kick. You could hear that one land in a back row.
Mendes throws a right hand that Maywho ducks under and follows up with a left that Maywho also avoids with ease.
Mendes is looking to wear down Maywho with body shots, infact he's throwing more body shots than head shots at the moment.

Mendes has Maywho up against the cage in a clinch.

Mendes pulls guard effortlessly.

That's one minute gone in the round.

Mendes wriggles free and stands up.
Nice body kick from Mendes.
Mendes comes forward and lands a shot to the body, then darts back out of range.
Maywho looks winded!
Maywho shoots in for a double leg but Mendes sprawls well. That's going to sap some energy.
Mendes closes the distance and clinches.
Mendes is working on a single leg takedown against the cage. Maywho can't fight it off and eventually Mendes manages to take the fight to the floor. Maywho looks annoyed but at least he's managed to land in guard.
Mendes controlling from the top position.
Mendes decides to stand up and beckons his opponent to follow.

That's two minutes gone in the round.
The fight moves into the clinch position.
This has been an exciting period of action!
Mendes gets double underhooks and manages to take the fight to the ground.
Mendes preventing the sweep.
Mendes sitting in guard here, content to control.
Mendes decides to stand up and beckons his opponent to follow.
Mendes lands a head kick. Maywho smiles back at him and beckons him forward.
Mendes drives through and clinches with Maywho against the cage.
Mendes gets a nice trip takedown into half guard.

That's three minutes gone in the round.
Maywho wants to get back to full guard but Mendes has passed into side control.
Mendes decides to stand back up.
Mendes pushes Maywho up against the cage in a clinch.
Mendes is trying to trip Maywho. He has hold of a leg but Maywho is hopping around, keeping his balance for the moment. Mendes persists though and gets the takedown into guard.
Mendes stands and steps away. Maywho gets to his feet too and we're back to the striking game.
Maywho doesn't manage to clinch there - Mendes circles away.
Maywho misses with a takedown attempt. He shot from a bit too far out.
Maywho just manages to avoid a counter high kick fromMendes.
Maywho shoots for a takedown but Mendes saw that one coming a mile off and avoided it easily.
Mendes instigates a clinch.
Maywho is fighting off a takedown attempt but Mendes is just too persistent for him and manages to trip Maywho to the mat. Maywho regains guard as soon as the fighters hit the mat.
Mendes stays in close to Maywho's body and controls the position.

That's four minutes gone in the round.
Maywho striking off his back but it's not causing Mendes any problems.
Mendes is just sitting in guard, looking to avoid any submissions.
Maywho is trying to control the position but Mendes postures up.
Maywho wants to stand up but Mendes is controlling him.
We may be looking at a referee standup if the pace doesn't pick up soon.
Maywho is working an open guard so Mendes takes the opportunity to get back to his feet.
And that�s the end of the round � the fighters go back to their corners.
Jake Mendes dominated that round.
The cut man is working on Carl Maywho's cut.
Well, the break between rounds is over. Let's get back to the scrappin!

Maywho doesn't manage to clinch there - Mendes circles away.
A jab lands there for Mendes.
Mendes gets in close and instigates a clinch.
Maywho is looking to score with knees to the body. Maybe he'll change it up and go body then head. Mendes is defending well for now.
Maywho tries to break the clinch but Mendes is controlling the position.
Maywho utilising his Muay Thai to score with a knee to the body.
Mendes turns his hips and lands a very nice judo throw into side control!
Maywho is looking to work his way out of this bad position but Mendes is controlling him well.
We've had a slow start to the round here - hopefully the action picks up.
Mendes decides to take the fight back to the feet.
The fight moves into the clinch position.
Mendes wants the takedown. Maywho is fighting it off but Mendes persists and manages to bring the fight to the ground, ending up in Maywho's guard against the cage.
The fighters are pressed up against the cage, both looking to find a bit of space to work.
That's one minute gone in the round.
Mendes is stalling in the full guard.
Mendes gets to his feet. Maywho looking to butt scoot but the ref puts an end to that. On your feet son!
Nice body punch from Mendes.
Maywho fails to land with a series of punches.
Carl Maywho is looking to throw some combinations by the looks of things.
Maywho tries for a takedown but Mendes sees it coming a mile off and avoids it easily.
Mendes defends well against a solid takedown attempt from Maywho.
Mendes throws a head kick that misses.
Maywho gets his takedown attempt stuffed easily
enabling Mendes to counter with a crisp jab.
Jake Mendes has stuffed three takedown attempts in the round now. That's going to take a lot out of Carl Maywho.
Maywho is breathing heavily.
Mendes rushes Maywho and pushes him back against the cage in a clinch.
That's two minutes gone in the round.
Mendes jumps guard and drags Maywho to the mat. He's obviously going to be looking for submissions off his back.
A real slowdown in the pace of the fight for a moment, as Mendes holds on and takes a little breather.
Mendes is really dominating this fight. Is there anything that Maywho can do to turn this around?
Maywho would like to get this fight back to the feet but can't get free from the closed guard.
That's three minutes gone in the round.
Mendes seems keen to control rather than go for a submission, at least for now.
Mendes pushes Maywho off and gets back to his feet.

Maywho closes the distance and presses his opponent up against the cage.
Maywho is fighting off a takedown attempt but Mendes is just too persistent for him and manages to trip Maywho to the mat. Maywho regains guard as soon as the fighters hit the mat.
The ref warns both fighters not to hold the cage as they work up against the meshing.
Mendes postures up.
Mendes sitting in guard here, content to control.
That's four minutes gone in the round.
Maywho tries to land a sweep but no joy.
Mendes controlling from the top position.
Maywho is working from a closed guard but he's struggling to control his opponent.
Mendes stands and steps away. Maywho gets to his feet too and we're back to the striking game.
Jake Mendes is winning the standup battle so far.
Maywho tries to clinch but Mendes is having none of it.
Mendes lands with a cross.
Maywho tries to close the distance and clinch up but Mendes swats him away and circles back towards the center.
Mendes jinks towards his opponent looking like he wants to counter with a mid kick but doesn't commit.
And that�s the end of the round � the fighters go back to their corners.
Jake Mendes dominated that second round.
The cut man is working on Carl Maywho's cut.
The fighters' corners scream their final instructions, as the referee calls time. Here we go, back to the action! Ladies and gentlemen, this is the final round!

Mendes instigates a clinch.
Mendes tightens his grip and picks Maywho up, before dumping him to the ground. Maywho manages to land in guard.
Mendes is just sitting in guard, looking to avoid any submissions.
Maywho is working an open guard so Mendes takes the opportunity to get back to his feet.
Mendes throws a hook to the body but it doesn't connect.
Mendes instigates a clinch.
Maywho looks like he'd prefer to be striking at range right now.
Mendes gets a nice trip takedown into half guard.
Mendes content to sit in half guard and control for a moment.
Mendes has controlled the position for a good 20 seconds, which will no doubt be starting to frustrate his opponent.
That's one minute gone in the round.
Mendes gets to his feet - back to striking we go!
Maywho looks for a takedown here. Will he get it? Mendes is fending him off so far but Maywho persists. Nope, Mendes circles away and we're back to standing.
Mendes gets in close and instigates a clinch.
Mendes prevents a takedown attempt there.
Maywho is trying to break free.

Maywho pushes off and circles away, back to the middle of the mat.
Maywho gets tackled into the cage by Mendes. Mendes maintains the clinch.
Mendes gets a trip takedown into half guard.
Mendes is figuring out what he wants to do next.
Mendes decides to return to a standing position.
That's two minutes gone in the round.
Mendes tries a head kick but it misses.
Mendes is using his height advantage well here, landing a good percentage of his punches.
Mendes lands with a straight right. Maywho didn't see that one coming.
Mendes closes the distance and clinches.
Mendes has clasped his hands together around Maywho's back... aaand, he's got a takedown into side control. Nicely done.
Wooooo! Give it up for these two warriors! They are putting on a show!
Mendes decides to stand back up. Mendes steps back and let's Maywho get back to his feet.
Mendes fakes with an overhand right and moves in to clinch with Maywho, pushing him back against the cage.
Mendes tightens his grip and picks Maywho up, before dumping him to the ground. Maywho manages to land in guard.
Maywho controls Mendes momentarily but Mendes frees himself.
Mendes decides he's had enough of playing guard and decides to stand. Come on Maywho, up you get!
The fight moves into the clinch position.
That's three minutes gone in the round.
Mendes being controlled against the cage.
Maywho is trying to pull guard but Mendes has him pressed against the cage.
Jake Mendes has stuffed three takedown attempts in the round now. That's going to take a lot out of Carl Maywho.
Maywho taking a breather.
Mendes tightens his grip and picks Maywho up, before dumping him to the ground. Maywho manages to land in guard.
Maywho controls Mendes momentarily but Mendes frees himself.
Mendes stands up from Maywho's guard - Mendes perhaps looking for a knockout.
That's four minutes gone in the round.
My god... these two guys really need to pick up the pace or everyone will leave to go get a beer.
Mendes avoids the clinch attempt nicely.
Mendes keeps the fight on the outside.
Mendes swats away the attempt to clinch by Maywho.
Maywho fails in his attempt to clinch.
Mendes swung with a counter punch to the body but it didn't connect.
Mendes avoids the head kick by Maywho.
Mendes ducks down and throws a hook to the body.
Maywho takes a big intake of breath there - he's definitely tired.
Maywho throws a body kick that digs right into the meat.
Maywho gets his head snapped back by a nice shot there.
Mendes fakes a head punch and goes low to the body. Nicely done.
Mendes cracks Maywho with a hook to the temple - Maywho is on wobbly legs here! Mendes swarms him with hook after hook, landing with each one! Maywho falls to the canvas face first and the referee dives in to stop the fight! Mendes wins by TKO!
Ladies and gentlemen, after 4:48 of round 3, we have a winner by way of TKO (Punches). Jake Mendes!
A victorious Jake Mendes thanked his army of followers in his post fight interview, telling people to make sure they follow him on Twitter.
|
|
|
|
|
|
|
|
|
|
|
|
|
|
|
|
|
|
|
|
|
|
|
| S |
C
A |
G |
S |
C
B |
G |
|
S |
C |
G |
|
energy
A | B |
|
hype
A | B |
|
pop
A | B |
|
mgr
A | B |
|
FIGHT
RATING
64% |
|
|
|
|
|
|

