|
|
PBP Commentary |
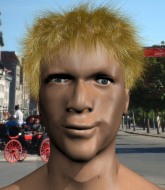
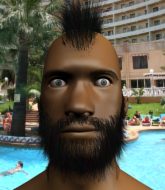
Coming up we have a bantamweight MMA rules bout between Johnny Pearson (ranked 896 p4p, 45 weight class) and Haywood Badger (ranked 1182 p4p, 59 weight class). Johnny Pearson has a significant reach advantage - let's see if he can make it count.
 |
|
 |
| 174 cm
25
138 lbs
13 - 7 - 0 |
|
161 cm
40
134 lbs
24 - 14 - 0 |
Good wrestling
World class MT
Insanely flexible |
|
Good wrestler
World class boxer
Granite chin |
|
| |
|
Ladies and gentlemen. This fight is 3 rounds, in the bantamweight division.
Introducing the fighter to my left, fighting out of the red corner.
With a record of
13 - 7 - 0, fighting out of New York, Johnny Pearson!
And introducing the fighter to my right, fighting out of the blue corner.
With a record of
24 - 14 - 0, fighting out of Las Vegas, Haywood Badger!
The judges for this bout are Joseph Jones, Lou da Vinci and Chad Campbell.

The bell rings for round one and we are underway!

Pearson moves into the clinch successfully.
Badger has a couple of punches blocked by Pearson.
Pearson lands a damaging elbow.
Badger blocks a body shot from Pearson.
Pearson tries to land a shot to the body but it's blocked.
Pearson lands a hook that snaps the head of Badger backwards.
Badger swings wildly with an uppercut but Pearson uses good head movement to avoid it.
Badger tries to throw a body punch but Pearson avoids it by throwing Badger back against the cage.
Badger throws a punch but it's blocked by Pearson.
Pearson misses with a hook to the ribs.
Pearson misses with a punch on the inside.
Pearson lands a knee to the body.
Pearson missing with knees to the body.
Pearson lands a glancing elbow in the clinch.
Pearson lands an elbow that stopped Badger in his tracks for a moment.
Pearson scores with an uppercut up the middle.
The crowd cheering loudly, showing their appreciation for the quality fight we're seeing here.
Badger misses with the head strike.
Badger avoids a wild elbow strike from Pearson.
Pearson misses with the head strike.
Pearson lands a body shot.
Badger scores with an uppercut up the middle.

That's one minute gone in the round.
Badger lands a right hand that snaps the head of Pearson backwards.
Pearson scores with a shot to the side of Badger's head.
A short left from Pearson.
Pearson goes for a body shot but it's blocked.
Pearson lands with a light punch inside.
Pearson lands with a left to the head.
A quick uppercut on the inside from Pearson.
Nice body punch from Pearson.
Knees in the clinch landing for Pearson.
Pearson struggles to land a body shot inside as Badger controls his hands.
Still in the clinch, Pearson scores with a nice short uppercut.
Pearson lands a body punch.
This has been an exciting period of action!
Badger managing to block the knees to the body from Pearson.
A head punch on the inside from Badger fails to land.
Badger dodges an elbow strike from Pearson.
Pearson fails to land with a short punch on the inside.
Pearson lands a right hand.
A short right from Pearson.
Badger lands a right uppercut that snaps the head of Pearson backwards.
Pearson landing knees to the body.

That's two minutes gone in the round.
Pearson digs a right hand into Badger's ribs. Those have got to be taking their toll on Badger's gas tank.
Pearson digs a right hand underneath Badger's ribcage. Badger let out a lung full of air as it connected.
Badger blocks an elbow strike from Pearson.
A head punch on the inside from Badger fails to land.
Badger throws a punch but it's blocked by Pearson.
Pearson pushes Badger back against the cage and unloads with a body punch.
A left hand lands to the body for Pearson.
Badger looks winded!
Pearson landing some nice looking knees to the body.
Badger told us before the fight that he's been working on his elbows. An under utilised technique these days - let's see if it can sway the outcome of the fight.
A right hook to the body lands for Pearson.
Pearson presses Badger against the cage and delivers a mid-strength body shot.
Pearson lands a nice uppercut.
Pearson crunches a lovely knee into Badger's ribcage.
Pearson putting his Muay Thai to good use. He has Badger in a tight clinch and is doing some damage with knees to the body.
Pearson makes some space for himself and lands an uppercut.
Pearson creates a bit of space for himself and sneaks an elbow through Badger's defenses.
A short right hand to the side of the head by Pearson.
Badger misses with a shot to the kidneys.
Badger takes a shot to the head.
Pearson tried to land a shot to the body but connects with Badger's elbow.

That's three minutes gone in the round.
An uppercut to the body lands inside from Pearson.
Pearson goes for a body shot but it's blocked.
Badger blocks a body shot from Pearson.
Pearson pushes Badger back against the cage and lands a hook to the side of the head.
Pearson tries to land a shot to the body but it's blocked.
Pearson goes for a body shot but it's blocked.
Badger swings wildly with an uppercut but Pearson uses good head movement to avoid it.
Pearson lands punches inside but they're not really causing much damage.
A head punch blocked on the inside by Pearson.
A short right from Pearson on the inside.
Pearson struggles to land a body shot inside as Badger controls his hands.
Pearson struggles to land a body shot inside as Badger controls his hands.
Badger blocks a body shot from Pearson.
Pearson misses with a body punch.
Pearson swings wildly with an uppercut but Badger uses good head movement to avoid it.
Still in the clinch, Pearson scores with a nice short uppercut.
The referee is keeping an eye on Badger - much more stalling and he will separate the fighters.

That's four minutes gone in the round.
Pearson throws a blind hook that connects with the side of Badgers head.
Pearson goes for a body shot but it's blocked.
A quick uppercut on the inside from Pearson.
The fans in attendance giving it up for the two fighters, who have really let it all hang out in the last minute or so!
A nice left hand lands by Pearson.
A head punch blocked on the inside by Pearson.
Pearson lands a shoulder strike that jolts his opponent's head backwards.
Still in the clinch, Badger scores with a nice short uppercut.
A shot in the inside from Pearson.
A head punch blocked on the inside by Pearson.
Pearson misses with a shot to the kidneys.
Pearson scores with a hook to the body.
Badger fails to land with a short punch on the inside.
Pearson tries a body shot but Badger blocks it.
The crowd applaud the fighters' efforts here as the round comes to an end.
Pearson working on landing some head shots here - that one got through nicely.
Pearson misses with a hook to the ribs.
Pearson working Badger over with knees to the body.
Pearson lands a short shot on the inside that snaps the head of Badger backwards.
Pearson comes over the top with an elbow. That landed flush.
And that�s the end of the round � the fighters go back to their corners.
Johnny Pearson dominated that round.
The minute break is over - no more time for sponges and pep talks - back to the action!

Badger takes a body punch but keeps moving.
Johnny Pearson seems to be the more aggressive standup fighter in this bout.
Pearson jabs Badger right on the nose. Badger blinks but takes it well.
Pearson scores with a jab.
Pearson looking to land some kicks to the body here.
Pearson throws a combination but it was largely blocked by Badger.
Badger tries to land a leg kick but Pearson saw it coming and moves away.
Pearson misses the shot to the body.
Pearson throws a wild body kick that Badger sees coming a mile off.
Pearson tries to clinch but fails miserably
and Badger counters with a crisp hook to the side of the head.
Pearson avoids the body shot from Badger.
Pearson throws a hook but Badger avoids it easily.
We've had a slow start to the round here - hopefully the action picks up.
Pearson misses with a few strikes there.
Pearson scores with a kick to the midsection.
Badger circles away from the clinch attempt.
Pearson misses with a low kick.
A clash of legs there as Pearson blocks the low kick.
As Badger tries to get set, Pearson tries to push him back and clinch up but Badger manages to avoid the attempt.
This has been an exciting period of action!
Pearson just misses with a punch to the body.
Badger appears to be waiting to throw a counter punch to the body.
That's one minute gone in the round.
Pearson smiles there as he lands a nice right hand right on the button.
Badger fakes a couple of low kicks, before throwing one on the third attempt. It connects and Pearson has to reset his feet before getting ready to engage.
Pearson fakes the leg kick and cracks Badger in the body.
Pearson misses with a wild body shot.
Pearson buckles his opponent's knee momentarily with a nice leg kick.
Pearson lands a nice looking kick to the body. Badger takes a step back to recover.
Badger throws a chopping leg kick but Pearson manages to avoid taking any serious damage.
Badger moves out of range of the body kick.
Pearson connects with a hook to the side of his opponent's head.
Pearson tries to clinch up against the cage, rushing in to close the distance. Badger manages to break the clinch and circles back to the middle of the mat.
Badger steps to his left, right into the path of a big body kick from Pearson. That one must have hurt.
Pearson bobbing and weaving, closes the distance and lands a hook to the side of Badger's head.
Pearson lands with a nice low kick. That'll leave a bruise.
The fans in attendance giving it up for the two fighters, who have really let it all hang out in the last minute or so!
Pearson uses good footwork to avoid the strikes from Badger.
Pearson keeps his opponent at a distance with a nice jab.
That's two minutes gone in the round.
Pearson doesn't manage to clinch there - Badger circles away.
We've been told by Pearson's head coaches at Midnight MMA that he's been working on his takedown defense in preparation for this fight.
Pearson moves into the clinch successfully.

Badger's corner calls for him to break the clinch, which he does.
Pearson lands with a nice body punch.
Badger slips under a jab.
Badger throws a low kick but Pearson avoids it.
Nice cross by Pearson.
Pearson is using his height advantage well here, landing a good percentage of his punches.
Pearson scores with a punch to the gut of his opponent.
Badger throws a big shot that misses.
Pearson tries to clinch but Badger is having none of it.
Pearson is really dominating this fight. Is there anything that Badger can do to turn this around?
Pearson throws a body kick that digs right into the meat.
Pearson misses the body punch
and Badger counters with a series of strikes. Pearson will be more careful next time no doubt.
Pearson tests Badger's chin there with a solid looking shot.
A chopping leg kick lands by Pearson.
Pearson has closed the distance and engaged Badger in a clinch.
That's three minutes gone in the round.
Badger tries a body shot but Pearson blocks it.
Badger misses with a short punch on the inside.
Badger pushes off and circles away, back to the middle of the mat.
Pearson tries to clinch there but Badger circles away.
Badger tries a low kick but Pearson avoids it.
Pearson misses with a body shot. Nice footwork from Badger.
A cross from Pearson lands.
Pearson tries to clinch but is not successful on this occasion.
Pearson works over Badger's head and body with a nice combination.
A shot to the liver by Pearson. Beautiful body shot.
Badger is looking to chop away at Pearson's legs.
Pearson scores with a decent looking hook.
Badger takes a nasty kick to the mid section... That should keep him thinking. Does he try and block and risk a head kick landing?
Both fighters circling a little - Pearson finishes the exchange with a kick to the body.
This is a great period of action - very entertaining stuff!
Badger sees a low kick coming and goes to check it, but it's actually a body kick and it thuds into his unprotected ribs.
Badger is breathing heavily.
Pearson lands a right hook to the body.
That's four minutes gone in the round.
Pearson fakes a jab and scores with a low kick.
Pearson is using his reach advantage well here, landing the more effective single shots from range.
Badger shakes his hands off, looking to compose himself, but takes a jab to the jaw whilst he does it.
Pearson forces Badger back against the cage and clinches.
Badger's head jolts backwards as he takes an uppercut right on the button!
Badger tries a body shot but Pearson blocks it.
Badger takes an elbow to the temple.
Pearson misses with a knee to the head.
Badger takes an elbow to the temple.
Badger has a couple of punches blocked by Pearson.
Badger misses with a body punch.
Badger lands a body punch - he's looking to wear down Pearson.
Badger has developed a nice purple lump on his ribcage, as a result of some heavy body kicks from Pearson.
A left hand lands to the body for Pearson.
Pearson prevents a body shot from Badger.
The crowd applaud the fighters' efforts here as the round comes to an end.
Badger takes a shot to the head.
A right hook to the body lands for Pearson.
Pearson lands a left hand.

Badger is rocked!
Pearson putting his Muay Thai to good use. He has Badger in a tight clinch and is doing some damage with knees to the body.
Pearson throws an elbow but it misses.
And that�s the end of the round � the fighters go back to their corners.
Johnny Pearson dominated that second round.
Well, the break between rounds is over. Let's get back to the scrappin! This is the final round!

Pearson connects with a slap. Keep your fist closed son.
Badger is still on wobbly legs! Can Pearson finish him?
Pearson drops Badger with a straight left! Oh this is bad for Badger! Pearson dives in and starts dropping bombs - the referee has no choice but to step in and save him!
Ladies and gentlemen, after 0:09 of round 3, we have a winner by way of TKO (Strikes). Johnny Pearson!
|
|
|
|
|
|
|
|
|
|
|
|
|
|
|
|
|
|
|
|
|
|
|
| S |
C
A |
G |
S |
C
B |
G |
|
S |
C |
G |
|
energy
A | B |
|
hype
A | B |
|
pop
A | B |
|
mgr
A | B |
|
FIGHT
RATING
89% |
|
|
|
|
|
|
