|
Play
by Play - Fighter's Fight Commentary
|
Event:
FFS 21: Eastside Jacksonville
Date: Jul 18, 2020 |
#R1#
The bell rings for round one and we are underway!
Cranswick fails to land the takedown.#CL2#
Del Gaiso has Cranswick up against the ropes in a clinch.
Del Gaiso lands with a short punch from the clinch.
Cranswick gets underhooks to prevent Del Gaiso's takedown attempt.
Cranswick is trying to force a seperation but Del Gaiso has the dominant position.#BC#
Cranswick breaks from the clinch.
#CL2#
Del Gaiso closes the distance and clinches.
Del Gaiso misses with some punches.
We've had a slow start to the round here - hopefully the action picks up.
Cranswick blocks an uppercut.
#TD2#
Del Gaiso has Cranswick pressed up against the ropes. He's trying to work for a single leg takedown. Del Gaiso pulls back from the ropes and twists to the side, sending Cranswick tumbling to the mat - Del Gaiso dives into Cranswick's guard.
Del Gaiso won't allow Cranswick to get back to his feet.
Del Gaiso throwing strikes from guard but Cranswick blocks nicely. #T1#
Cranswick preventing the ground and pound from doing any damage. #SUB#
Cranswick throwing his legs up looking for a triangle.
Cranswick knows he needs to get back to his feet asap. He's simply no match for Del Gaiso on the ground.
Cranswick can't keep his opponent in guard - Del Gaiso advances to half guard, no doubt looking to mount.
Del Gaiso working Cranswick over with strikes.
Del Gaiso sitting in half guard, looking to land shots. Cranswick defending well though.
Cranswick is trying to stand up here but Del Gaiso is controlling him well.
Del Gaiso throwing shots but Cranswick is blocking nicely. #SU2#
Del Gaiso decides to stand and escape the position.
Del Gaiso jabs Cranswick right on the nose. Cranswick blinks but takes it well.
Cranswick misses with a double jab.
#T2#
A big left from Del Gaiso misses.
Cranswick closes the distance and lands a one-two.
Nice sprawl there from Cranswick as Del Gaiso shoots in.#CL2#
Del Gaiso gets to the clinch - let's see what his plan is here.
A short right from Del Gaiso.
This has been an exciting period of action!
Del Gaiso working on landing some head shots here - that one got through nicely.
Del Gaiso has a body lock and is looking for a takedown. Cranswick is bouncing around trying to prevent the takedown and somehow he has indeed managed to stay on his feet.
Liam Cranswick has stuffed three takedown attempts in the round now. That's going to take a lot out of Romeo Del Gaiso.
Del Gaiso lands a shoulder strike that jolts his opponent's head backwards. #TD2#
Del Gaiso ties up his opponent against the ropes and manages to drag the fight down to the ground. Del Gaiso no doubt will be looking to work submissions from his guard.
Cranswick has decided he wants to stand but the closed guard of Del Gaiso is proving hard to escape from.
Del Gaiso looking to hit a scissor sweep but Cranswick is one step ahead there.
Cranswick would like to get this fight back to the feet but can't get free from the closed guard.
And that's the end of the fight!
Romeo Del Gaiso comfortably won the final round on my scorecard.
I think Del Gaiso has won this one but let's see whether the judges agree with me. Over to the ring announcer for the scorecards.
Ladies and gentlemen, after 1 round of action, we go to the scorecards for a decision.
Judge Jorge Garcia scores the fight 9:10
Judge John Roberts scores the fight 9:10
Judge Russell Pearce scores the fight 9:10
In favor of your winner, by unanimous decision... Romeo Del Gaiso!
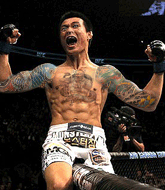
Our winner, Romeo Del Gaiso, made sure he spent some time buttering up the crowd during his post fight interview, which will no doubt bring him a few more fans. |
|
|
|
Event:
FFS 13: Pahokee
Date: Jun 20, 2020 |
#R1#
The bell rings for round one and we are underway!
Cranswick misses with a jab and misses with a cross straight after too.
#CL2#
Reno fakes with an overhand right and moves in to clinch with Cranswick, pushing him back against the ropes.
Cranswick wants to push off and get back to the center of the mat but Reno has him pressed against the ropes.#BC2#
Reno manages to break the clinch.
Cranswick misses with a wild combination.
Cranswick fails to land with the punch combination there - jab, cross, hook, miss, miss, miss.
A cross from Cranswick lands.#CUT#It looks like Michael Reno has been cut.#CL2#
Reno rushes Cranswick and presses him up against the ropes.#BC2#
Reno breaks from the clinch.
Cranswick throws a right and a left that Reno avoids nicely. #CL2#
The fight moves into the clinch position.
Reno lands an uppercut.
This has been an exciting period of action!#BC2#
Reno pushes off and circles away, back to the middle of the mat.
Cranswick tries to drive through with a takedown attempt but Reno defends well and Cranswick ends up having to push Reno into the ropes where they will battle it out in the clinch.#CL2#
Reno forces Cranswick back against the ropes and clinches.
Reno scores with a nice hook to the head.#T1#
Reno landing knees to the head.
#BC2#
Reno pushes off and circles away, back to the middle of the mat.#CL2#
Reno instigates a clinch.
A frustrated look appears on Cranswick's face as he tries to break the clinch. #BC2#
Reno breaks from the clinch.
#CL#
Cranswick clinches up against the ropes.
Reno lands a shoulder strike that jolts his opponent's head backwards.
Reno lands with a good tight uppercut to the head.
Cranswick is trying to push Reno away but Reno has him pressed against the ropes, so he's going nowhere.#BC2#
Reno escapes the clinch and we're back to striking.
#CL2#
Reno has Cranswick up against the ropes in a clinch.
#BC2#
Reno breaks the clinch and we're back to striking at distance.
#CL2#
Reno has managed to clinch.
Reno lands with a right to the head. #T2#
The crowd cheering loudly, showing their appreciation for the quality fight we're seeing here.
Reno lands a right uppercut that snaps the head of Cranswick backwards.
Cranswick is trying to work out of this bad position, with his back against the ropes.
Cranswick working hard to break the clinch.
Cranswick is trying to force a seperation but Reno has the dominant position.
Cranswick wants to break free but Reno has control.
Cranswick looks like he'd prefer to be striking at range right now.#BC2#
Reno breaks the clinch and we return to the middle of the mat.
Michael Reno seems to be the more aggressive standup fighter in this bout.
Cranswick motions for Reno to come forward. Cranswick throws a leg kick but it misses it's target. #CL2#
The fight moves into the clinch position.#BC2#
Reno escapes the clinch and we're back to striking.
#CL2#
Reno has managed to clinch.
Reno lands a shoulder strike that jolts his opponent's head backwards.
Reno working on landing some head shots here - that one got through nicely.
Cranswick wants to push off and get back to the center of the mat but Reno has him pressed against the ropes.
And that's the end of the fight!
Michael Reno comfortably won the final round on my scorecard.
I think Reno has won this one but let's see whether the judges agree with me. Over to the ring announcer for the scorecards.
Ladies and gentlemen, after 1 round of action, we go to the scorecards for a decision.
Judge Reed Andrews scores the fight 9:10
Judge John Kavanagh scores the fight 9:10
Judge Alyssa Summers scores the fight 9:10
In favor of your winner, by unanimous decision... Michael Reno!
Michael Reno gave a mention to SynCity Fightwear in his post fight interview. That will please them (and hopefully generate some sales). |
|
|
|
Event:
FFS 5: Palatka
Date: May 16, 2020 |

The bell rings for round one and we are underway!
Gates steps to the side to avoid the strikes from Cranswick.
Gates tries to score a power double leg takedown but Cranswick sees that one coming and sprawls well. That will dishearten Gates somewhat.

Gates pushes Cranswick up against the ropes in a clinch.
Gates avoiding damage.

Gates's corner calls for him to break the clinch, which he does.
We've had a slow start to the round here - hopefully the action picks up.
Gates gets in close and instigates a clinch.
Gates taking a breather.
A right handed body shot lands from Gates.

That's one minute gone in the round.
Cranswick tries to break the clinch but Gates is controlling the position.
Gates is stalling here. The referee will be looking to step in if he doesn't pick up the pace.
Cranswick looks like he'd prefer to be striking at range right now.
Gates has a body lock and is looking for a takedown. Cranswick is bouncing around trying to prevent the takedown and somehow he has indeed managed to stay on his feet.
Cranswick is trying to break the clinch but Gates has him pressed against the ropes.
Cranswick gets double underhooks to prevent a takedown attempt from Gates.
That's three failed takedown attempts in the round for Kevin Gates. That's going to take a lot out of him.
Cranswick wants to break the clinch but can't.
Gates keeps control of Cranswick as he tries to wriggle out of the double underhooks.
Gates misses the knee to the body. Nice hip positioning from Cranswick.

That's two minutes gone in the round.
A few boos can be heard. I'm sure they will multiply if the fighters don't pick up the pace.
Some stalling of biblical proportions here from Gates.

Cranswick breaks from the clinch.
Cranswick fails to land with a series of punches.
Gates is looking to counter punch.
Cranswick feints a jab promting Gates to slip. Cranswick then demonstrates his capabilities by jabbing again. Gates slips again and ducks right into an uppercut.

Gates feints and then dives in with a takedown. That was a long way out but the feint bought him enough time to close the distance and complete the takedown. Now we'll play guard for a bit and see who can get the better of that position.
Cranswick is trying to keep Gates in close.

Gates decides to stand up and beckons his opponent to follow.
The crowd thankful this round is nearly over.

Oooooh!!! Cranswick has knocked Gates down with a huge combo! Cranswick steps away and waves a wobbly Gates back to his feet! This one might not go much longer!

Gates is rocked!
Gates lands with a nice body kick.
And that's the end of the fight!
Liam Cranswick comfortably won the final round on my scorecard.
I think Cranswick has won this one but let's see whether the judges agree with me. Over to the ring announcer for the scorecards.
Ladies and gentlemen, after 1 round of action, we go to the scorecards for a decision.
Judge Reed Andrews scores the fight 9:10
Judge Jorge Garcia scores the fight 9:10
Judge Eddie Farnsworth scores the fight 9:10
In favor of your winner, by unanimous decision... Liam Cranswick! |
|
|
|
Event:
TWGC 29 (170lbs, D3): Sydney Qualifier - Round 1
Date: Apr 17, 2020 |
Coming up we have a welterweight Tycoon World Grappling Championship rules bout between Bong Ji Woo (ranked 7041 p4p, 0 weight class) and Liam Cranswick (ranked 6840 p4p, 489 weight class). Over to our ring announcer for the fighter introductions!
This TWGC bout is 1 fifteen minute round in the welterweight division. Introducing today's competitors. In the red corner, competing out of Los Angeles, with a TWGC record of 0 wins and 0 losses; Bong Ji Woo! And in the blue corner, fighting out of Sydney, with a TWGC record of 0 wins and 0 losses; Liam Cranswick!
The judges for this bout are Ron Honeybunn, Winston Howard and Ben Hemmingworth.
The fighters connect hands in the middle of the mat and we are under way.
Cranswick doesn't manage to clinch there - Ji Woo circles away.
Ji Woo moves into the clinch.
Ji Woo works for the underhooks and manages to get a trip takedown into guard. Score +2 for takedown into guard / half guard: Ji Woo (2) vs (0) Cranswick
Ji Woo advances position into side control! Score +3 for passing guard: Ji Woo (5) vs (0) Cranswick
Cranswick gives up the full mount - oops, sloppy defensive grappling there! Score +2 for reaching mount: Ji Woo (7) vs (0) Cranswick

Ji Woo has hold of an arm here, looking to extend it. He's committed to the armbar attempt here! Will he get it?! Yes! Cranswick is forced to tap!
Ladies and gentlemen, after 0:40 of round 1, we have a winner by way of Submission (Armbar). Bong Ji Woo!
Bong Ji Woo really struggled to get his t-shirt on before his hand was raised. Making sure that Conviction logo gets some air time is pretty tricky when you're all sweaty. |
|
|
|
Event:
Quick Fight Championship
Date: Apr 10, 2020 |
#R1#
A decent looking cross lands there for Cranswick.
Wakeling throws a sloppy head kick and Cranswick moves out of range easily.
Wakeling will need to tighten up his combinations if he doesn't want to gas himself out, swinging at thin air.
Cranswick throws a series of punches but Wakeling avoids them all with ease. #KD2#
Wakeling sets himself and throws a head kick that knocks Cranswick to the ground! Wakeling dives into full mount looking to finish!#CUT2#
It looks like Liam Cranswick has been cut.
The fans in attendance giving it up for the two fighters, who have really let it all hang out in the last minute or so!
Cranswick tries to lock up and control but Wakeling gives him a forearm to the face and pushes him away.
Cranswick is desperately trying to get back to half guard.
Cranswick gets back to half guard.
Cranswick manages to get to full guard.
#SUB#
Cranswick looking for a guillotine here but Wakeling defends easily.
#SUB#
Cranswick looking for submissions off his back, moving his hips, looking for an opening.
#SUB#
Wakeling got a little sloppy there for a moment and Cranswick has worked his way into a loose triangle - can he finish it?! No, Wakeling has managed to get both his arms back between Cranswick's legs - danger averted.#T1#
Cranswick controls Wakeling momentarily but Wakeling frees himself.
The ref warns both fighters not to hold the cage as they work up against the meshing.#SUB#
Cranswick throwing his legs up looking for a triangle.
Wakeling is looking to stand up but Cranswick won't let him. #SUB#
Cranswick working from the bottom, still in full guard. He's managed to get a loose triangle. Wakeling doesn't seem to be doing much to defend here, obviously he feels comfortable in the position. Wakeling manages to throw the legs off his shoulder and he's back into guard - no problem. #SUB#
Cranswick looking for a guillotine here but Wakeling defends easily.
Cranswick has a closed guard, preventing Wakeling from standing up. #SUB#
Cranswick working from the bottom, still in full guard. He's managed to get a loose triangle. Wakeling doesn't seem to be doing much to defend here, obviously he feels comfortable in the position. Wakeling manages to throw the legs off his shoulder and he's back into guard - no problem. #SUB#
The fighters are going at a pretty good pace and they're both starting to sweat now.
Cranswick is looking for a triangle but Wakeling pushes his legs off easily.
#T2##SUB#
Cranswick looking for submissions off his back, moving his hips, looking for an opening.
Cranswick is breathing heavily.#SUB#
Cranswick is looking for a guillotine. You can't force these things though and Wakeling defends well.
Wakeling really doesn't want to stay on the ground with Cranswick. If he can't get it back to his feet, it's only a matter of time before he'll be tapping out.
Wakeling has decided he wants to stand but the closed guard of Cranswick is proving hard to escape from.
Wakeling postures up.
Cranswick controlling the position.#SUB#
Cranswick is working actively off his back, looking to secure an arm or perhaps work for a triangle.
Wakeling would like to get this fight back to the feet but can't get free from the closed guard. #SUB#
Cranswick is working actively off his back, looking to secure an arm or perhaps work for a triangle.
Wakeling must be cautious of submissions here, given that his opponent has the superior Jiu Jitsu.
Wakeling tries to stand but Cranswick is controlling from the bottom. #T3#
Cranswick is trying to keep Wakeling in close.
The fighters are pressed up against the cage, both looking to find a bit of space to work.#SUB#
Cranswick working for a triangle but Wakeling defends it easily.
#SUB#
Cranswick escapes his hips to the side and looks to be working for an armbar. Wakeling gives him a little smile and shakes his head. No chance.
Wakeling tries to stand but Cranswick is controlling from the bottom.
Cranswick tries to strike from the bottom.
Cranswick has a closed guard, preventing Wakeling from standing up. #REF3#
The referee has stepped in and called for a break in the action. We'll restart on the feet.
Wakeling moves into range and throws a combination. A nice jab followed by a hook to the body.#KD2#
Wakeling drops Cranswick with a nice combination! Wakeling dives into Cranswick's guard, looking to finish!
#ROC2#
Cranswick is rocked!#T4#
We've seen a great period of action over the last minute or so - credit to both fighters for going all out!
Wakeling wants to get up but he can't break Cranswick's closed guard. He needs to be careful trying to break the legs open, as he's open to submissions here.
Oh Cranswick is still in real trouble! Will he be able to recover?!!
Wakeling is using up a lot of energy trying to get back to his feet. Perhaps he should improve his position first.#SUB#
Cranswick is active off his back here, looking for submissions.
Cranswick seems to have got his legs back now.
Wakeling would like to get this fight back to the feet but can't get free from the closed guard. #SUB#
Wakeling avoids a guillotine attempt easily.
Wakeling wants to stand but Cranswick is controlling his posture from full guard. #SUB#
Cranswick is looking for a guillotine. You can't force these things though and Wakeling defends well.
Wakeling wanted to stand there but Cranswick had control of the position.
And that�s the end of the round � the fighters go back to their corners.
Richard Wakeling dominated that round.
The cut man is working on Liam Cranswick's cut.
The minute break is over - no more time for sponges and pep talks - back to the action!
#R2##KD2#
Wakeling lands a high kick to the side of Cranswick's head that stuns him and send him tumbling down to the canvas! Wakeling dives into guard, looking to finish.#SUB#
Cranswick throwing his legs up looking for a triangle.
Cranswick has a closed guard, preventing Wakeling from standing up. #SUB#
Cranswick had isolated an arm as going for a kimura. Wakeling defends it easily.#SUB#
Cranswick has a loose triangle. He'll be looking to tighten that up but Wakeling can see exactly what he's planning and manages to posture up and free himself. #SUB#
Cranswick has a loose triangle. He'll be looking to tighten that up but Wakeling can see exactly what he's planning and manages to posture up and free himself.
The crowd are loving this. Great action here.#SUB#
Wakeling avoids a guillotine attempt easily.
Both fighters are absolutely exhausted here.#SUB#
Cranswick working from the bottom, still in full guard. He's managed to get a loose triangle. Wakeling doesn't seem to be doing much to defend here, obviously he feels comfortable in the position. Wakeling manages to throw the legs off his shoulder and he's back into guard - no problem. #T1#
Cranswick is controlling Wakeling's posture.#SU2#
Wakeling stands up and waves to Cranswick to follow him. #KD2#
Wakeling lands a high kick to the side of Cranswick's head that stuns him and send him tumbling down to the canvas! Wakeling dives into guard, looking to finish.
Wakeling is looking to stand up but Cranswick won't let him. #SUB#
Cranswick looking for submissions off his back, moving his hips, looking for an opening.
#ES#
Cranswick manages to wriggle out and sneak his way back up to his feet, so the fighters are now clinched up against the cage.
The fans in attendance giving it up for the two fighters, who have really let it all hang out in the last minute or so!#BC2#
Wakeling breaks the clinch and we're back to striking at distance.
Cranswick takes a head kick and keeps coming.
Wakeling looks for a left high kick but can't connect. Wakeling backs up to catch a breather... no he lunges forward with a huge flying knee that smacks Cranswick's temple! It sends Cranswick violently to the canvas! The crowd goes nuts as Wakeling celebrates and the doctors try to help Cranswick!
Ladies and gentlemen, after 2:56 of round 2, we have a winner by way of KO (Flying Knee). Richard Wakeling!
|
|
|
|
|
|
|