|
|
PBP Commentary |
Coming up we have a welterweight MMA rules bout between Charles Traynor (ranked 2620 p4p, 3706 weight class) and Drew Peacock (ranked 346 p4p, 446 weight class). Traynor comes to the cage accompanied by Crazy Train by Ozzy Osbourne. Peacock comes into a darkened arena with his song building. John Williamson - True Blue kicks in, the lights come on and the crowd goes wild! What a showman! Over to our ring announcer for the fighter introductions!
 |
|
 |
| 182 cm
19
170
3 - 3 - 0 |
|
177 cm
19
170
3 - 3 - 0 |
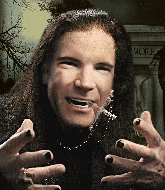
Decent wrestler
Excellent MT
KO power |
|
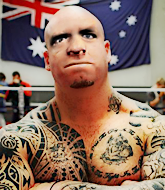
Good wrestler
Counter fighter
Granite chin |
|
| |
|
Ladies and gentlemen. This fight is 3 rounds, in the welterweight division.
Introducing the fighter to my left, fighting out of the red corner.
With a record of 3 - 3 - 0, fighting out of Montreal, Charles Traynor!
And introducing the fighter to my right, fighting out of the blue corner.
With a record of 3 - 3 - 0, fighting out of New York, Drew Peacock!
The judges for this bout are Columbo Gatti, Dean Styles and David Schapiro.

The bell rings for round one and we are underway!
Traynor lands a jab-cross combination.
Traynor fails to land with the punch combination there - jab, cross, hook, miss, miss, miss.
Peacock let fly with a counter punch to the body but it didn't land.
Traynor misses with a body shot
and Peacock counters with a shot to the ribs. That looked like it hurt.
Peacock slips a jab and a cross from Traynor.
Peacock tries to close the distance and clinch but Traynor swats him to one side with an open hand palm strike and circles away.
A telegraphed right hand from Traynor misses the target.
Traynor lands with a cross to side of his opponent's head.
Peacock uses good head movement to avoid the hook from Traynor.
Peacock now looks to counter with a shot at the body.
A big right from Peacock misses.
Peacock takes a solid shot to the body. That one hurt him but he's trying not to show it.
Traynor throws a lazy right hand but Peacock sees it coming a mile off and sidesteps it easily.
Traynor stalks Peacock and leaps in with a furious combination of punches. Uppercuts and crosses smash into Peacock's face. Peacock staggers backwards, shaken.
We've seen a great period of action over the last minute or so - credit to both fighters for going all out!
Peacock ducks under an overhand right and circles away with a smile on his face.
Peacock now looks to counter with a shot at the body.
Peacock throws a shot from downtown. Traynor moves away and avoids it.
Peacock moves out of range as Traynor strikes.
Peacock let fly with a counter punch to the body but it didn't land.
Traynor swings and misses with a hook to the body.
A looping hook to the body misses from Traynor. Peacock does a little dance to reset his feet.
A countering left hand to the body from Peacock misses.

That's one minute gone in the round.
Traynor throws the left hand but Peacock avoids the punch easily.
Traynor misses with a body punch
and Peacock counters with a right hand to the body.
Traynor just misses with a punch to the body.
Traynor misses with a body shot.

Peacock closes the distance and presses his opponent up against the cage.
Peacock misses with a shot to the kidneys.
Peacock blocks a couple of punches on the inside.
Peacock lands a right hand.
Traynor blocks a couple of punches on the inside.
Peacock looks more muscular than last time we saw him. He must have been on the weights.
Traynor is trying to maintain a safe position but Peacock gets an underhook and turns Traynor into the cage.
A hook to the body from Peacock.
Peacock doesn't land with the attempted body shot.
Traynor tries to land a shot to the body but it's blocked.
Peacock misses with a body punch.
Peacock tries to throw a body punch but Traynor avoids it by throwing Peacock back against the cage.
Traynor trying to stall but Peacock improves his position.
Peacock tries to throw a body punch but Traynor avoids it by throwing Peacock back against the cage.
Peacock lands with a left to the head.
Peacock fails to land with a short punch on the inside.

That's two minutes gone in the round.
Peacock blocks a body shot from Traynor.
An uppercut to the body lands inside from Peacock.

Traynor breaks the clinch and we return to the middle of the mat.
Peacock tries to clinch up.
Peacock moves into range and clinches up with Traynor.
We've seen a great period of action over the last minute or so - credit to both fighters for going all out!
Peacock tries to throw a body punch but Traynor avoids it by throwing Peacock back against the cage.
Traynor breaks the clinch and we're back to striking at distance.
Peacock ducks down and throws a hook to the body but Traynor moves away.
Traynor bobs and weaves well there to avoid the strikes.
Jab by Peacock.
Traynor looks to land a right hand but Peacock moved out of range.
Traynor blocks a jab.
Traynor sizes up Peacock with a pawing jab and scores with a straight right down the middle.
Traynor throws a hook to the side of Peacock's head but Peacock sees it coming and ducks under it beautifully.
Nice defenses there by Peacock.
Sloppy strikes from Traynor. Those never looked like landing.
Traynor definitely looks more muscular than last time we saw him fight.

That's three minutes gone in the round.
Traynor throws a series of punches but Peacock moves out of range.
Peacock moves out of range of the strikes.
Peacock moves in looking to clinch but Traynor pushes him off.
Traynor wants to take advantage of his opponent's missed offense by moving into the clinch.
Traynor misses with a looping left.
Peacock defending well as Traynor loads up on a big left hand.
Traynor dips down and scores with a jab to the body.
Traynor scores with a nice strike.
Traynor's jab looks to have found its range, popping Peacock under the eye.
Peacock instigates a clinch.
Traynor escapes the clinch and we're back to striking.
Traynor fails to land with the punch combination there - jab, cross, hook, miss, miss, miss.
Traynor tries to land with a swinging hook to the body but Peacock was well out of range. Poor timing from Traynor.
Peacock tries to close the distance and clinch up but Traynor swats him away and circles back towards the center.
Traynor ducks down and throws a hook to the body but Peacock moves away.
Peacock swings for the body but Traynor moves out of range.

That's four minutes gone in the round.
Traynor throws a right hand that misses
and Peacock counters with a straight right hand.
This is a great period of action - very entertaining stuff!
Traynor misses with a combination
enabling Peacock to counter with a crisp jab.
Traynor throws a decent looking leg kick but it doesn't land clean.
Traynor lands a leg kick that knocks Peacock off balance momentarily.
Traynor misses with a jab to the body
and Peacock counters with a nice uppercut.
Traynor rushes forward with a series of wild hooks but Peacock moves out of range and avoids them all easily.
Peacock uses good head movement to avoid the hook from Traynor.
Traynor bobbing and weaving, closes the distance and lands a hook to the side of Peacock's head.
Peacock tries to close the distance and clinch up against the cage but Traynor paws at him with a jab and circles away.
Traynor thows a left - swing and a miss!
Peacock avoids a lazy jab quite easily.
Traynor misses with an uppercut. Peacock saw that one coming.
Traynor moves out of range as Peacock strikes.
A shot to the body from Traynor misses
and Peacock counters with a quick right hand to the jaw.
And that is the end of the round. The fighters go back to their corners.
Charles Traynor dominated that round.
That's time! Back to the action!

Peacock throws a hook to the body but it doesn't connect.
Peacock stuns Traynor with a nice body shot, before stepping back out of range.
Traynor on the wrong end of a vicious looking body shot.
Peacock tries to clinch but Traynor is having none of it.
Traynor wants to land a leg kick but Peacock is out of range.
Charles Traynor seems to be the more aggressive standup fighter in this bout.
Traynor smiles there as he lands a nice right hand right on the button.
Traynor looks to land a left hand but Peacock moved out of range nicely.
Traynor throws a good cross that connects.
Peacock moves out of range of the strikes.
Traynor scores with a jab to the jaw.
We've had a slow start to the round here - hopefully the action picks up.
Peacock has Traynor up against the cage in a clinch.
Peacock lands with a short punch from the clinch.
Peacock has a couple of punches blocked by Traynor.
Peacock tries to work over Traynor's body with a swooping hook but it only glances the target.
Traynor doesn't land with the attempted body shot.
Traynor blocks a body shot from Peacock.
That's one minute gone in the round.
Traynor trying to control the position but instead, Peacock has worked for underhooks and has pushed Traynor into the cage.
Traynor breaks the clinch and we're back to striking at distance.
Traynor lands with a nice body punch.
Charles Traynor is winning the standup battle so far.
Traynor listening to his corner there, landing a nice uppercut.
Traynor lands a slapping body shot.
Peacock avoids a punch combination nicely.
Traynor misses with a body punch
and Peacock counters with a crisp hook to the side of the head.
Traynor throws a body shot but no joy.
Traynor misses with an uppercut.
Traynor misses with a hook.
Peacock tries to clinch but Traynor moves out of range.
Traynor connects with a body shot that sends Peacock's belly button to the back.
Traynor walks straight into an uppercut. Luckily it didn't land flush.
That's two minutes gone in the round.
Peacock doesn't manage to clinch there - Traynor circles away.
Peacock moves out of range of the strikes.
Traynor throws a hook to the side of Peacock's head but Peacock sees it coming and ducks under it beautifully.
The fans in attendance giving it up for the two fighters, who have really let it all hang out in the last minute or so!
Peacock pushes Traynor up against the cage in a clinch.
An uppercut on the inside fails to land for Peacock.
Peacock lands with a short shot to the head.
Traynor lands an uppercut.
Traynor cracks Peacock with a nice body shot.
Traynor manages to break the clinch.
Traynor scores with a hook to the body. Peacock takes a step back and tries to catch his breath.
Traynor throws a hook but Peacock avoids it easily.
Traynor will need to tighten up his combinations if he doesn't want to gas himself out, swinging at thin air.
Peacock bobs and weaves well there to avoid the strikes.
Traynor throws a hard body shot but it just misses.
That's three minutes gone in the round.
Traynor throws a lazy uppercut
and Peacock counters with a lovely straight right hand!
Traynor loads up on a big right hand but Peacock slips the punch.
Traynor lands a jab. Then a cross. Then finally a nice hook to the body. Good work there by Traynor.
Traynor walks into a straight right hand from Peacock.
Traynor throws a body shot but no joy.
Peacock takes one to the side of the head.
The fighters are starting to perspire pretty heavily.
Nice jab there from Peacock.
Traynor throws a lazy right hand but Peacock sees it coming a mile off and sidesteps it easily.
Peacock bobs and weaves well there to avoid the strikes.
Peacock throws a shot from downtown. Traynor moves away and avoids it.
Traynor tries to counter by clinching up but Peacock breaks away and moves out of range.
Peacock gets in close and instigates a clinch.
Traynor misses with a hook to the ribs.
A short left from Peacock.
We've seen a great period of action over the last minute or so - credit to both fighters for going all out!
A right handed body shot lands from Peacock.
Traynor is working hard here but doesn't seem to be able to control effectively, up against the cage.
That's four minutes gone in the round.
Traynor blocks a punch to the side of the head.
Peacock lands a short shot on the inside that snaps the head of Traynor backwards.
Nice body punch from Peacock.
Peacock can't find room to land a body shot as Traynor controls the action.
Traynor misses with a shot to the kidneys.
Drew Peacock seems to be working more effectively in the clinch in the fight so far.
Peacock struggles to land a body shot inside as Traynor controls his hands.
Peacock tries to throw a body punch but Traynor avoids it by throwing Peacock back against the cage.
A head punch on the inside from Peacock fails to land.
Peacock can't find room to land a body shot as Traynor controls the action.
Peacock scores with a shot to the side of Traynor's head.
Peacock tries to land a shot to the body but it's blocked.
Traynor misses with a punch on the inside.
Traynor prevents a body shot from Peacock.
Traynor blocks a couple of punches on the inside.
Peacock lands with a light punch inside.
Peacock tries to throw a body punch but Traynor avoids it by throwing Peacock back against the cage.
Traynor breaks from the clinch.
Traynor throws a hook but Peacock blocks it.
Good shot there by Traynor.
And that is the end of the round. The fighters go back to their corners.
That was a close second round but I would say that Charles Traynor will probably get the nod.
The minute break is over - no more time for sponges and pep talks - back to the action! The crowd applaud as we get ready to start the final round!

Traynor moves his head to the side to avoid a jab but walks straight into a cross.
Traynor throws a jab when Peacock was well out of range.
Peacock defending well as Traynor loads up on a big left hand.
Traynor throws a jab but it's blocked by Peacock.
Traynor throws a body punch but Peacock moves out of range.
Peacock tries to clinch but Traynor moves out of range.
Traynor throws a leg kick but he was too far away and it doesn't land.
A little jabbing left from Peacock on the counter but it doesn't find it's target.
Peacock moves out of range of the strikes.
Peacock swings and misses with a hook to the body.
An attempted straight right counter from Traynor misses the target.
Peacock is looking to clinch but Traynor is avoiding it.
We've had a slow start to the round here - hopefully the action picks up.
Peacock tries to clinch up but Traynor circles away and keeps his distance.
Traynor misses with a hook. Peacock ducked under it nicely.
Traynor throws a monster uppercut resembling something out of street fighter but it doesn't land.
Traynor swings and misses with a hook to the body.
And an attempted straight right on the counter from Peacock! But no joy.
Traynor swings widly with a right hand
and Peacock counters with a straight right hand.
That's one minute gone in the round.
A clash of legs there as Peacock blocks the low kick.
Peacock now looks to counter with a shot at the body.
Traynor walks into a jab.
Traynor tries to keep at a distance but Peacock has taken the fight into the clinch.
Peacock lands on the inside with an uppercut.
Peacock misses with a hook to the ribs.
Traynor tries a body shot but Peacock blocks it.
Peacock misses with a hook to the ribs.
Traynor pushes off and circles away, back to the middle of the mat.
Peacock moves into the clinch successfully.
Peacock goes for a body shot but it's blocked.
Traynor misses with a punch to the body.
Traynor is trying to slow down the pace in the clinch, to catch his breath.
Traynor tries to break free but Peacock pushes him back against the cage.
A right handed body shot lands from Traynor.
A short body shot lands from Peacock as the two fighters clinch.
Peacock pushes Traynor back against the cage and lands a hook to the side of the head.
That's two minutes gone in the round.
Traynor can't break the clinch.
A head punch on the inside from Peacock fails to land.
Peacock makes some space for himself and lands an uppercut.
Peacock lands a body punch - he's looking to wear down Traynor.
Peacock misses with a shot to the kidneys.
Peacock working on landing some head shots here - that one got through nicely.
This is a great period of action - very entertaining stuff!
Traynor has had enough of the clinch but Peacock keeps him there for the moment.
Traynor breaks from the clinch.
Peacock looks to score with a jab to the body but Traynor is just out of range.
Peacock clinches with his opponent.
Peacock lands with a quick shot inside that doesn't really do much damage.
Traynor breaks the clinch.
Jab, jab by Peacock - just one landing.
Traynor slips a jab from Peacock.
Peacock takes the fight into the clinch.
Peacock swings away with an uppercut that misses.
That's three minutes gone in the round.
Peacock misses with a hook to the ribs.
Peacock misses with a punch to the body.
Traynor tried to land a shot to the body but connects with Peacock's elbow.
Traynor tries to throw a body punch but Peacock avoids it by throwing Traynor back against the cage.
An uppercut on the inside fails to land for Peacock.
Peacock misses with a punch on the inside.
Peacock working some nice short punches in the clinch.
Traynor breaks the clinch and we're back to striking at distance.
Traynor misses with a looping left.
Traynor throws a shot to the body.
Traynor lands a nice shot to the body.
Traynor throws a solid leg kick but Peacock takes the impact on his shin and smiles at Traynor.
Peacock is clearly trying to counter these attacks from Traynor with a body shot.
Traynor lands a jab to the nose.
Peacock throws a poor cross that misses
and Traynor counters with a one-two to the body.
The fighters circling - Peacock throws out the jab but it was never going to land.
Traynor misses with a two punch combination.
Drew Peacock has stepped it up - he knows he needs a finish here!
That's four minutes gone in the round.
Traynor fakes a head shot and lands one to the body.
This is a great period of action - very entertaining stuff!
Traynor misses with a looping left.
Peacock closes the distance and presses his opponent up against the cage.
Peacock blocks a body shot from Traynor.
Peacock misses with a body punch.
Peacock lands with a short punch from the clinch.
Peacock tries a body shot but Traynor blocks it.
An uppercut to the body lands inside from Peacock.
Both fighters are breathing heavily.
Peacock misses with a shot to the kidneys.
Peacock misses with a body punch.
Peacock throws a punch but it's blocked by Traynor.
Peacock lands a left hand that snaps the head of Traynor backwards.
Traynor breaks the clinch and we're back to striking at distance.
Charles Traynor is fighting for a decision here - he's started to take the cautious approach.
Traynor pushing out the jab but it's not landing.
Peacock closes the distance and pushes Traynor back into the cage.
Traynor is trying to break the clinch but Peacock is controlling him.
Traynor takes a shot to the head.
And that's the end of the fight!
Drew Peacock comfortably won the final round on my scorecard.
I think Traynor has won this one but let's see what the judges have to say. Over to the ring announcer for the scorecards.
Ladies and gentlemen, after 3 rounds of action, we go to the scorecards for a decision.
Judge Columbo Gatti scores the fight 29:28
Judge Dean Styles scores the fight 29:28
Judge David Schapiro scores the fight 29:28
In favor of your winner, by unanimous decision... Charles Traynor!
A relieved looking Charles Traynor thanked the fans for their support and gave the usual line about them being amazing. They seemed to believe that he actually meant it.
|
|
|
|
|
|
|
|
|
|
|
|
|
|
|
|
|
|
|
|
|
|
|
| S |
C
A |
G |
S |
C
B |
G |
|
S |
C |
G |
|
energy
A | B |
|
hype
A | B |
|
pop
A | B |
|
mgr
A | B |
|
FIGHT
RATING
68% |
|
|
|
|
|
|
