|
|
PBP Commentary |
Coming up we have a light heavyweight MMA rules bout between Danny Dawkins (ranked 23995 p4p, 24161 weight class) and Omar Bonga (ranked 0 p4p, 0 weight class). Both fighters really staring each other down here, as Omar Bonga enters the cage!
 |
|
 |
| 190 cm
24
212
1 - 1 - 0 |
|
190 cm
23
216
1 - 4 - 0 |
Great wrestler
World class boxer
Cardio machine |
|
Excellent grappler
Decent boxing
Solid chin |
|
| |
|
Ladies and gentlemen. This fight is 3 rounds, in the light heavyweight division.
Introducing the fighter to my left, fighting out of the red corner.
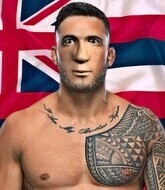
With a record of 1 - 1 - 0, fighting out of Amsterdam, Danny Dawkins!
And introducing the fighter to my right, fighting out of the blue corner.
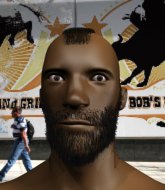
With a record of 1 - 4 - 0, fighting out of Montreal, Omar Bonga!
The judges for this bout are Patrick Alders, Nard Betker and Aafke Stam.

The bell rings for round one and we are underway!
Horrible takedown attempt by Bonga or perhaps it was just good defense by Dawkins, which made it look bad.
Dawkins throwing a counter right hand but Bonga manages to avoid it.
Bonga fails with a rather predictable takedown attempt.
Dawkins tries to counter by clinching up but Bonga breaks away and moves out of range.
Bonga is looking to clinch but Dawkins is avoiding it.
A little feinted left hand from Dawkins on the counter but he doesn't commit to it.
Bonga does a little shimmy and throws a leg kick. The leg kick missed by a considerable margin though, making him look a little bit silly for doing the shimmy.
Dawkins is looking to counter punch.
We've had a slow start to the round here - hopefully the action picks up.
Dawkins blocks a leg kick.

Bonga darts in and lands a nice takedown into half guard.
Dawkins tries to strike from the bottom but it doesn't land.

That's one minute gone in the round.
Dawkins blocking the ground and pound attempt from Bonga.
Bonga has the superior BJJ but he's also working some ground strikes into his gameplan.
Dawkins is trying is best to control the position here.
Bonga seems very keen to just sit and control from half guard but Dawkins does not like that idea so much and is remaining active off his back.
Dawkins keeping control of the leg, stopping his opponent passing to mount.
Dawkins wants to improve his position but Bonga is controlling well.
Dawkins is looking to control Bonga's leg but it's slowly edging free. Can Dawkins avoid being mounted?
Bonga missing with the ground and pound from half guard.
Bonga working Dawkins over with strikes.
Bonga controlling the pace.

That's two minutes gone in the round.
A lull in the action here being met with boos from the crowd.
Bonga is thwarting Dawkins's attempts to control the position.
Bonga looking to pass the half guard. Not this time.
Bonga slips a nice elbow through Dawkins's hands, connecting with Dawkins's forehead.
Dawkins is trying to maintain the position but Bonga is very close to passing his half guard.
Dawkins gets back to full guard.
Dawkins looking to hit a scissor sweep but Bonga is one step ahead there.
The fighters are pressed up against the cage, both looking to find a bit of space to work.
Dawkins wants to improve his position but instead Bonga has moved into half guard.

That's three minutes gone in the round.
Dawkins moves his hips nicely and gets into full guard.
Bonga pushes down on Dawkins's leg and manages to get into half guard.
Dawkins moves into full guard.
Bonga stopping the sweep attempt from Dawkins.
Dawkins keeping full guard, as Bonga tries to pass.
Bonga is fighting to break Dawkins's control of his arms but Dawkins is doing a good job of controlling the position at the moment.
Dawkins working a defensive guard but Bonga manages to pass into side control anyway.
Dawkins is looking for a sweep.

That's four minutes gone in the round.
Dawkins is working hard here to advance position.
Bonga misses with an attempted head punch from side control.
Bonga wants to control but Dawkins is keeping him busy.
Bonga is staying tight to Dawkins's torso, preventing him from escaping.
Dawkins defending against the ground and pound.
Bonga lands a knee to the body and a forearm to the face.

Bonga thinks about going for a far side armbar but bails out and retains the dominant position instead.
The ref warns both fighters not to hold the cage as they work up against the meshing.
Boooooooooooooooooooo!!! God, this has been a terrible round. Come on you two, sort yourselves out!
Dawkins is positioning himself to get back to half guard.
And that is the end of the round. The fighters go back to their corners.
Omar Bonga dominated that round.
Well, the break between rounds is over. Let's get back to the scrappin!

Bonga shoots in for a takedown. He's persisting with it as Dawkins sprawls well. Dawkins wins this battle and keeps the fight standing. Bonga gets slowly back to his feet.
Dawkins keeping at a good range here, avoiding a leg kick.
It looked like Dawkins wanted to counter with a hook but didn't fully commit.
Dawkins checks a low kick. Bone on bone - not my idea of a good time.
Dawkins is looking to counter punch.
Bonga throws a sloppy body shot
and Dawkins counters with a good right hand that lands right on the jaw.

It looks like Omar Bonga has been cut.
We've had a slow start to the round here - hopefully the action picks up.
Bonga drives through with a takedown into guard.
Bonga trying to control but Dawkins is working from the bottom.
Dawkins throws a couple of heel strikes.
That's one minute gone in the round.
Bonga won't allow Dawkins to sweep him here.
Bonga wants to control from the top but Dawkins keeps moving.
Dawkins seems keen to control rather than go for a submission, at least for now.
Dawkins throws some sloppy strikes off his back.
Dawkins has Bonga pulled in close to control his posture.

The referee decides to stand the fighters back up.
Bonga throws a combination that misses
and Bonga takes a counter punch right on the button for his troubles.
Bonga shoots in for a takedown. He's persisting with it as Dawkins sprawls well. Dawkins wins this battle and keeps the fight standing. Bonga gets slowly back to his feet.
Dawkins throwing a counter right hand but Bonga manages to avoid it.
That's two minutes gone in the round.
Bonga misses with a lunging right hand
enabling Dawkins to counter with a crisp jab.
Nice sprawl there from Dawkins as Bonga shoots in.
Danny Dawkins has stuffed three takedown attempts in the round now. That's going to take a lot out of Omar Bonga.
Bonga thows a left - swing and a miss!
Bonga throws a quick inside leg kick.
Dawkins slaps away a takedown attempt from Bonga, before circling back to the center of the mat.
That's three minutes gone in the round.
Dawkins defending well as Bonga loads up on a big left hand.
Dawkins was looking to counter that move with a punch but didn't quite pull the trigger.
Bonga throws a hook but Dawkins avoids it easily.
Bonga shoots in for a takedown. "Ole!" shouts Dawkins as he jumps to the side.
Bonga fails miserably with a takedown attempt.
It looked like Dawkins was trying to counter with a body shot coming off that last attack from Bonga.
Bonga is trying hard to land a takedown here. Dawkins sprawls well and keeps this one on the feet.
It looked like Dawkins wanted to counter with a hook but didn't fully commit.
Dawkins looks to have improved his striking defense since last time we saw him fight.
Bonga connects with a hook to the side of his opponent's head.
That's four minutes gone in the round.
Bonga misses with a low kick as Dawkins jumps back.
Dawkins throwing a counter right hand but Bonga manages to avoid it.
Bonga is the aggressor but that punch slipped nicely by Dawkins.
Bonga tries to clinch but is not successful on this occasion.
Bonga misses with a low kick as Dawkins jumps back.
Bonga throws out a leg kick but Dawkins moves out of range and Bonga only half commits.
Boooooooooooooooooooo!!! God, this has been a terrible round. Come on you two, sort yourselves out!
Bonga shoots in for a takedown. He's persisting with it as Dawkins sprawls well. Dawkins wins this battle and keeps the fight standing. Bonga gets slowly back to his feet.
And that is the end of the round. The fighters go back to their corners.
Danny Dawkins dominated that second round.
The cut man is working on Omar Bonga's cut.
The fighters' corners scream their final instructions, as the referee calls time. Here we go, back to the action! This is the final round!

Bonga darts in and out, connecting with a jab.
This fight brought to you by 5M nutrition - it's mmmmm tasty. Nice jab by Bonga.
Bonga throws a sloppy body shot
and Dawkins counters with a crisp hook to the side of the head.
Bonga gets the takedown into side control.
Bonga has been the more effective fighter overall so far.
We've had a slow start to the round here - hopefully the action picks up.
Dawkins manages to work his way to half guard, despite Bonga's best efforts.
Dawkins is looking for a sweep. Bonga is wise to his cunning plan and keeps the top position.
Bonga stalling away here and it's allowed Dawkins to slip out his trapped foot and regain full guard.
Dawkins seems keen to control Bonga's posture.
That's one minute gone in the round.
Dawkins is working the butterfly guard. He manages to land a nice scissor sweep and is now in half guard on the top. Nice move.

Bonga is trying to maintain the position but Dawkins is very close to passing his half guard.
Dawkins working the head and body with strikes.
Bonga trying to control but Dawkins postures up.
Dawkins slips a nice elbow through Bonga's hands, connecting with Bonga's forehead.
Dawkins sitting and controlling from the half guard.
That's two minutes gone in the round.
Dawkins working the head and body with strikes.
Bonga is concentrating on defense, preventing Dawkins from advancing position.
Bonga is not content to let Dawkins control the position.
Dawkins with a momentary lay and pray from half guard.
Dawkins is scoring with some nice ground and pound from the dominant position.
Bonga taking some punishment here, with Dawkins in his half guard.
That's three minutes gone in the round.
Bonga wants to control but Dawkins is keeping busy.
Dawkins working the head and body with strikes.
Bonga is trying to control but can't.
Dawkins works his way into side control.
Dawkins works a knee to the body and follows up with a nice elbow to the head.
Dawkins working the ground and pound from side control.
Dawkins controls the position.
Bonga is looking to reverse the position.
Dawkins works a knee to the body and follows up with a nice elbow to the head.
Dawkins in side control lands a nice looking series of punches and elbows.
That's four minutes gone in the round.
Bonga takes a big shot right to the temple there but he's taken it well.
The referee tells the fighters to keep busy.
Bonga is looking to regain half guard here but Dawkins keeps moving and retains side control.
Dawkins scores with a couple of nice shots to the head there. The referee takes a look at Bonga to see if he's OK.
The crowd thankful this round is nearly over.
Dawkins slows the pace down.
Bonga is not content to let Dawkins control the position.
And that's the end of the fight!
Danny Dawkins showed his dominance in that final round.
Well Dawkins has outscored his opponent in every aspect of the fight today. Only a scarily incompetent judge or two will keep him from a well deserved win... Over to the ring announcer for the scorecards.
Ladies and gentlemen, after 3 rounds of action, we go to the scorecards for a decision.
Judge Patrick Alders scores the fight 29:28
Judge Nard Betker scores the fight 29:28
Judge Aafke Stam scores the fight 29:28
In favor of your winner, by unanimous decision... Danny Dawkins!
A very excited looking Danny Dawkins made sure he remembered to thank all the fans both in the arena and on the internet. He said all the coolest people spend all day on MMA websites, which got a big reaction.
In defeat, Omar Bonga stepped up to the mic, saying 'Today Bonecrusher... he get crushed '.
|
|
|
|
|
|
|
|
|
|
|
|
|
|
|
|
|
|
|
|
|
|
|
| S |
C
A |
G |
S |
C
B |
G |
|
S |
C |
G |
|
energy
A | B |
|
hype
A | B |
|
pop
A | B |
|
mgr
A | B |
|
FIGHT
RATING
28% |
|
|
|
|
|
|
