 |
NYF Fight Night 4 PBP Commentary |
Undercard bout
|
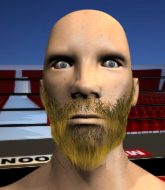
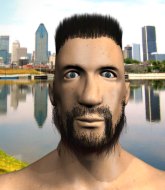
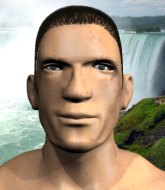
Coming up we have a middleweight MMA rules bout between Simo Hayha (ranked 5882 p4p, 5793 weight class) and Ray Francisco (ranked 530 p4p, 525 weight class). Well, I have no idea who's going to take this one!
 |
|
 |
| 184 cm
18
197
1 - 1 - 0 |
|
187 cm
25
195
1 - 2 - 0 |
BJJ White Belt
Basic striking
Self confident |
|
BJJ Blue Belt
Excellent boxer
Heavy handed |
|
| |
|
Ladies and gentlemen. This fight is 3 rounds, in the middleweight division.
Introducing the fighter to my left, fighting out of the red corner.
With a record of 1 - 1 - 0, fighting out of Los Angeles, Simo Hayha!
And introducing the fighter to my right, fighting out of the blue corner.
With a record of 1 - 2 - 0, fighting out of New York, Ray Francisco!
The judges for this bout are Lou da Vinci, Jonathan Paton and Eddie Farnsworth.

The bell rings for round one and we are underway!

Hayha gets to the clinch - let's see what his plan is here.
A nice right hand lands inside from Hayha.
Hayha swings wildly with an uppercut but Francisco uses good head movement to avoid it.
Hayha lands with a short punch from the clinch.
Hayha doesn't land with the attempted body shot.
An uppercut to the body lands inside from Hayha.
A body shot lands from Hayha.
Hayha doesn't land with the attempted body shot.
Hayha gets through Francisco's defenses to land a nice punch to the side of the head.
We've had a slow start to the round here - hopefully the action picks up.
Hayha lands a nice uppercut.
Hayha has been talking about how he's improved his wrestling in the run up to the fight so let's see if that's enough to sway the balance.
Hayha goes for a body shot but it's blocked.
Francisco wants to break the clinch but can't.
Hayha misses with a hook to the ribs.

That's one minute gone in the round.
A hook to the body from Hayha.
Francisco is trying to push Hayha away but Hayha has him pressed against the cage, so he's going nowhere.
Hayha cracks Francisco with a nice body shot.
Hayha lands with a light punch inside.
Hayha scores with a shot to the side of Francisco's head.
With the fighters clinched against the cage, Hayha creates a bit of distance for himself and scores with a nice uppercut.
A right hook to the body lands for Hayha.
Hayha lands a shoulder strike that jolts his opponent's head backwards.
A shot in the inside from Hayha.
A shot in the inside from Hayha.
Hayha lands a body punch - he's looking to wear down Francisco.
Francisco looks winded!
Hayha lands with a short shot to the head.

That's two minutes gone in the round.
Hayha lands a body shot in the clinch.
Wooooo! Give it up for these two warriors! They are putting on a show!
Hayha digs a right hand underneath Francisco's ribcage. Francisco let out a lung full of air as it connected.
Nice body punch from Hayha - that landed with a thud.
Good body shot from Hayha.
A nice left hand lands by Hayha.
A right hook to the body lands for Hayha.
Hayha scores with a nice hook to the head.
Hayha working on landing some head shots here - that one got through nicely.
Hayha lands a nice uppercut.
Francisco takes a shot to the head.
 Francisco is rocked! Francisco is rocked!
A left hand lands to the body for Hayha.
Hayha pushes Francisco back against the cage and lands a hook to the side of the head.
Francisco is still on wobbly legs! Can Hayha finish him?

That's three minutes gone in the round.
Francisco blocks a punch to the side of the head.
Hayha throws a head punch that misses.
Francisco blocking some punches.
Hayha misses with a short punch on the inside.
An uppercut on the inside fails to land for Hayha.
Hayha misses with a punch on the inside.
Hayha throws a head punch that misses.
Francisco seems to have recovered his senses.
Hayha lands a shoulder strike that jolts his opponent's head backwards.
Hayha is working Francisco over against the cage.
Hayha lands with a light punch inside.
Hayha dips a shoulder and cracks Francisco with a mighty uppercut! Francisco falls back against the cage and Hayha unloads with a barrage of strikes! Francisco is completely out with his eyes open, only supported by the cage! Save him ref! Eventually the ref decides to do his job and jumps in - Hayha screams abuse at the incompetent official before going over to celebrate with his corner. Brutal stuff!
Ladies and gentlemen, after 3:33 of round 1, we have a winner by way of TKO (Strikes). Simo Hayha!
|
|
|
|
|
|
|
|
|
|
|
|
|
|
|
|
|
|
|
|
|
|
|
| S |
C
A |
G |
S |
C
B |
G |
|
S |
C |
G |
|
energy
A | B |
|
hype
A | B |
|
pop
A | B |
|
mgr
A | B |
|
FIGHT
RATING
50% |
|
|
|
|
|
|
|
Undercard bout
|
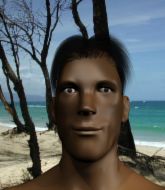
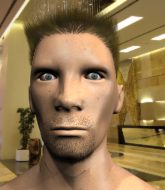
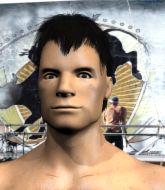
Coming up we have a middleweight MMA rules bout between Jackson Brown (ranked 2836 p4p, 3885 weight class) and John Aregood (ranked 358 p4p, 439 weight class). Rumors backstage are that the fighters have been paid to keep it standing but we know that would never happen in MMA!
 |
|
 |
| 210 cm
25
184
2 - 1 - 0 |
|
189 cm
26
197
1 - 3 - 0 |
BJJ White Belt
Excellent boxer
Good chin |
|
Good wrestler
Brawler
Solid chin |
|
| |
|
Ladies and gentlemen. This fight is 3 rounds, in the middleweight division.
Introducing the fighter to my left, fighting out of the red corner.
With a record of 2 - 1 - 0, fighting out of Sydney, Jackson Brown!
And introducing the fighter to my right, fighting out of the blue corner.
With a record of 1 - 3 - 0, fighting out of Las Vegas, John Aregood!
The judges for this bout are Anthony Taglia, Reed Andrews and Eddie Farnsworth.
The bell rings for round one and we are underway!
Aregood looks frustrated there after his takedown attempt is stuffed easily.
Aregood with a poor takedown
and Brown counters with a crisp hook to the side of the head.
Brown connects with a right hand. Aregood shakes it off.
Brown scores with a body shot.
Brown definitely looks more muscular than last time we saw him fight.
Brown lands a body shot.
Brown keeps the fight standing with a nice sprawl.
Jackson Brown has stuffed three takedown attempts in the round now. That's going to take a lot out of John Aregood.

Aregood clinches up against the cage.

Aregood turns his back and goes for a hip toss. It's a bit messy but it gets the job done and Aregood manages to end up in side control.
The fighters are pressed up against the cage, both looking to find a bit of space to work.
Fantastic stuff here - a very entertaining period of action, which has drawn cheers from the crowd.

Aregood thinks about going for a far side armbar but bails out and retains the dominant position instead.
Aregood looking for an arm triangle but it's way too loose to do anything.
Aregood is looking to finish here, going for an Americana. Brown knows the correct defense though, so he's OK.
Brown tries to improve position but can't.
That's one minute gone in the round.
Aregood is trying to land an Americana. He has the arm isolated but Brown is keeping cool and he's avoided the danger for now.
Brown tries to work a leg under to get back to half guard but Aregood wriggles his own leg back out and remains in side control.
You can see the frustration on Brown's face, being in this tough position on the bottom.
Brown is looking to regain half guard here but Aregood keeps moving and retains side control.
Brown on the wrong end of some ground and pound.
Aregood wants to work for a kimura but he's foiled early by Brown, who protects the arm well.
Both fighters take a look at the clock.
Aregood working away.
That's two minutes gone in the round.
Aregood tries for a kimura. Not really close to a finish though.
Brown on his back here. We all know that wrestlers don't like being on their back so let's see if Brown tries to get out of the position.
Brown tries to buck Aregood off but Aregood is having none of it.
Brown really does look like a pencil wearing a pair of gloves. Let's hope he has a gameplan to suit that ridiculous body shape.
Aregood working away.
Aregood looking for an arm triangle but it's way too loose to do anything.
The fighters are starting to perspire pretty heavily.
Aregood is trying to get an arm triangle but Brown is defending well.
Brown is trying to improve his position.
Brown wants to control but Aregood postures up.
Brown is positioning himself to get back to half guard.
That's three minutes gone in the round.
Aregood is looking for a kimura. He might have it! No, Brown has escaped the position, nice work there.
Brown tries to work a leg under to get back to half guard but Aregood wriggles his own leg back out and remains in side control.
Brown wants to escape from the position here - easier said than done!
Aregood goes for an armbar here - this could be all over! But no, Brown has escaped beautifully and is now on top in side control! Oh, that's unlucky for Aregood but great work by Brown.
Brown will need to keep those long limbs tucked in whilst he's on the ground, to prevent any submissions.
Aregood tries to get back to half guard but can't.
Brown taking a breather here.
Aregood tries to buck Brown off but Brown is having none of it.

That's four minutes gone in the round.

Brown stands up and beckons Aregood to his feet.
Aregood doesn't succeed with the takedown
and Brown counters with a lovely straight right hand!
Brown lets the fists fly and connects with a left straight followed by a right hook.
Aregood misses with a takedown attempt
and Brown makes him pay by landing a nice hook to the body before moving out of range.
Aregood looks winded!
Brown fakes and then throws a beautiful body shot. Aregood looks a bit winded and takes a step backwards to take a breath.
The fans in attendance giving it up for the two fighters, who have really let it all hang out in the last minute or so!
Brown closes the distance and pushes Aregood back into the cage.
Brown stays in close to his opponent and throws a right hand to the body.
The two fighters are working to gain dominance in the clinch.
Aregood has Brown pressed up against the cage and is working for takedown. Brown manages to improve position though and keeps the fight standing.
A short right from Brown.
Brown scores with a hook to the body.
Brown is working Aregood over against the cage.
Brown is trying to slow down the pace in the clinch, to catch his breath.

Brown breaks the clinch and we return to the middle of the mat.
Brown lands with a shot to the body.
Brown bobs and weaves and throws out a fast jab that snaps Aregood's head backwards.
And that is the end of the round. The fighters go back to their corners.
Jackson Brown dominated that round.
That's time! Back to the action!

Aregood shoots and misses
and Brown makes him pay by landing a nice hook to the body before moving out of range.
Aregood shoots in but doesn't get the takedown
and Brown counters with a quick right hand to the jaw.
Brown works Aregood's body with a nice hook.
Brown gets to the clinch - let's see what his plan is here.
Brown pushes Aregood back against the cage and lands a hook to the side of the head.
Brown doesn't land with the attempted body shot.
Brown scores with a nice hook to the head.
Aregood is rocked!
Brown's corner calls for him to break the clinch, which he does.
Aregood is still on wobbly legs! Can Brown finish him?
Aregood doesn't succeed with the takedown
and Brown counters with a shot to the ribs. That looked like it hurt.
Aregood seems to have recovered his senses.
Jackson Brown has stuffed three takedown attempts in the round now. That's going to take a lot out of John Aregood.
Brown cracks Aregood with a nasty uppercut that draws ooohs from the crowd and sends Aregood tumbling backwards onto the mat. He tries to recover but Brown pounces and lands a hail of unanswered strikes that forces the referee to step in to end the fight! Aregood is not happy but he gave the referee no choice!
Ladies and gentlemen, after 0:36 of round 2, we have a winner by way of TKO (Strikes). Jackson Brown!
Jackson Brown was full of energy after the big win and talked about how he thinks he can do big things in this sport. The crowd were appreciative of his determination to succeed.
|
|
|
|
|
|
|
|
|
|
|
|
|
|
|
|
|
|
|
|
|
|
|
| S |
C
A |
G |
S |
C
B |
G |
|
S |
C |
G |
|
energy
A | B |
|
hype
A | B |
|
pop
A | B |
|
mgr
A | B |
|
FIGHT
RATING
47% |
|
|
|
|
|
|
|
Undercard bout
|
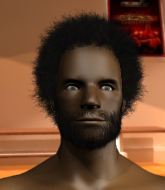
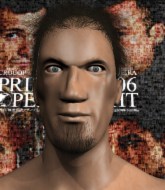
Coming up we have a middleweight MMA rules bout between Hugh Jass (ranked 3261 p4p, 4163 weight class) and Helio Flacide (ranked 390 p4p, 457 weight class). Over to our ring announcer for the fighter introductions!
 |
|
 |
| 195 cm
24
190
3 - 3 - 0 |
|
187 cm
27
194
5 - 6 - 0 |
BJJ White Belt
Excellent boxer
Very strong |
|
BJJ Brown Belt
Brawler
Knockout power |
|
| |
|
Ladies and gentlemen. This fight is 3 rounds, in the middleweight division.
Introducing the fighter to my left, fighting out of the red corner.
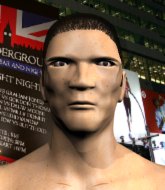
With a record of 3 - 3 - 0, fighting out of New York, Hugh Jass!
And introducing the fighter to my right, fighting out of the blue corner.
With a record of 5 - 6 - 0, fighting out of Los Angeles, Helio Flacide!
The judges for this bout are Steve Montenegro, Eddie Farnsworth and Russell Pearce.
The bell rings for round one and we are underway!
Flacide wants to clinch up but Jass keeps it at a distance.
Hugh Jass seems to be the more aggressive standup fighter in this bout.
No joy there for Flacide, who threw a few shots but didn't land.
Flacide drives through and clinches with Jass against the cage.
Jass escapes the clinch and we're back to striking.
Jass throws a hook but Flacide blocks it.
Flacide uses some good footwork to avoid the body shot by Jass.
Flacide takes one on the chin but keeps coming.
 It looks like Helio Flacide has been cut. It looks like Helio Flacide has been cut.
Flacide forces Jass back against the cage and clinches.
Jass is trying to break free.
Jass can't break the clinch.
Flacide is working for takedown but Jass is calmly controlling the position for now.
Flacide tries to take the fight to the ground by pulling guard but can't manage it.
Flacide is trying to pull guard but Jass turns him against the cage and we stay in the clinch.
Hugh Jass has stuffed three takedown attempts in the round now. That's going to take a lot out of Helio Flacide.
We've had a slow start to the round here - hopefully the action picks up.
Jass prevents a takedown attempt there.
Flacide jumps guard but Jass turns him against the cage and keeps the fight standing.
Jass wants to get back to striking at distance but Flacide won't allow it.
Jass wants to strike at distance but he can't break free of the clinch.
Flacide jumps guard but Jass turns him against the cage and keeps the fight standing.
That's one minute gone in the round.
Jass is trying to force a seperation but Flacide has the dominant position.
Flacide wants a takedown.
Flacide is trying to pull guard but Jass turns him against the cage and we stay in the clinch.
Jass is trying to break the clinch but Flacide is controlling him.
Flacide has been looking to improve his clinch game in recent weeks. Jass seems to have the measure of him in the clinch so far, so let's see if Flacide can turn it around.
Flacide tries to jump guard but he falls flat on his backside. Jass smiles and moves away.
A jab lands there for Jass.
Jass rushes forward with a series of wild hooks but Flacide moves out of range and avoids them all easily.
Jass misses with a few strikes there.
Jass throws a right hand that Flacide ducks under and follows up with a left that Flacide also avoids with ease.
Flacide steps in looking to clinch after the strikes miss from Jass.
Jass looks to score with a jab to the body but Flacide is just out of range.
Flacide doesn't react quick enough there as he takes a shot to the body.
Flacide moves into the clinch.
Flacide prevents Jass from breaking the clinch.
Jass wants to break free. God knows he wants to breaaaak freeee.
Flacide tries to pull guard but can't drag his opponent to the mat. Jass just stands there and leans against the cage.
Jass is trying to work out of this bad position, with his back against the cage.
That's two minutes gone in the round.
Flacide keeps the fight in the clinch, despite Jass's efforts to push away.
Jass is looking to break free of the clinch but Flacide has double underhooks.
Flacide wants a takedown but no success here.
Flacide manages to pull guard. Let's see whether he can land a sub off his back.
We could do with one of the fighters taking the initiative a bit more on the ground - they're both waiting to capitalize on a mistake.
Jass stands and steps away. Flacide gets to his feet too and we're back to the striking game.
Jass throws a hook to the body but it doesn't connect.
Flacide clinches up with Jass and pushes him back against the cage.
This has been an exciting period of action!
Jass tries to break free but Flacide pushes him back against the cage.
Flacide is trying to pull guard but Jass has him pressed against the cage.
Jass tries to break the clinch but Flacide is controlling the position.
Flacide is working for takedown but Jass is calmly controlling the position for now.
Flacide is trying to pull guard but Jass has him pressed against the cage.
Flacide fails to pull guard.
Flacide tries to jump guard but he falls flat on his backside. Jass smiles and moves away.
Flacide slips a jab and a cross from Jass.
Flacide ducks under a wild hook from Jass.
That's three minutes gone in the round.
Jass lands a head shot.
Jass misses with a wild body shot.
The fighters circle momentarily. Jass darts into range and connects with a nice straight punch.
Flacide takes a body punch that cleary hurt but he's trying not to show any weakness.
Flacide tries to clinch up but Jass circles away and keeps his distance.
Jass tries to land with a swinging hook to the body but Flacide was well out of range. Poor timing from Jass.
Jass connects with a body shot.
Flacide tries to clinch but is not successful on this occasion.
Jass throws a combination but comes up with nothing but fresh air.
Jass looks to score with a combo but nothing lands.
Jass is looking to wear down Flacide with body shots, infact he's throwing more body shots than head shots at the moment.
Jass misses with a series of wild punches.
Jass looks to have improved his striking defense since last time we saw him fight.
Jass scores with a nice head shot.
Flacide uses good footwork to avoid the strikes from Jass.
Flacide is trying to avoid his opponent's strikes and get into the clinch.
Flacide closes the distance and clinches.
The crowd are loving this. Great action here.
Flacide tries to pull guard but can't drag his opponent to the mat. Jass just stands there and leans against the cage.
Jass is using his height advantage well here, landing a good percentage of his punches.
Jass stops a takedown attempt from Flacide.
That's four minutes gone in the round.
Flacide is trying to work for a single leg takedown but Jass pulls him back up using the underhooks.
Flacide drops down looking for an ankle pick but Jass pulls his leg out and moves away.
Jass takes a swing at Flacide's ribcage but misses.
Jass clobbers Flacide with an overhand right that has the crowd gasping. That made a horrendous noise.
Flacide misses with a takedown attempt. He shot from a bit too far out.
Flacide wants to clinch.
Jass ducks down and throws a hook to the body.
Sloppy strikes from Jass. Those never looked like landing.
Jass sets himself, and Flacide steps forward looking for the clinch! Jass avoids it this time.
Jass lunges in with an uppercut that skims his opponent's chin.
Jass just misses with a punch to the body.
Flacide is trying to avoid his opponent's strikes and get into the clinch.
Jass circles away from the clinch attempt.
Flacide tries to close the distance and clinch up against the cage but Jass paws at him with a jab and circles away.
And that is the end of the round. The fighters go back to their corners.
Hugh Jass dominated that round.
The cut man is working on Helio Flacide's cut.
The fighters get back to their feet, the hooter sounds and we're back to the action!
No joy there for Jass, who threw a few shots but didn't land.
Flacide clinches.
Flacide decides to pull guard.
Flacide tries to land a sweep but no joy.
Jass gets to his feet - Flacide follows without any prompting.
Jass is really dominating this fight. Is there anything that Flacide can do to turn this around?
Jass lands the left hand.
Flacide tries to move into range but Jass moves to the side and lands with a nice right hand.
Flacide tries to close the distance and clinch up against the cage but Jass paws at him with a jab and circles away.
Flacide instigates a clinch.
Flacide is trying to pull guard but Jass turns him against the cage and we stay in the clinch.
Jass working hard to break the clinch.
Flacide is trying to pull guard but Jass has him pressed against the cage.
We've had a slow start to the round here - hopefully the action picks up.
Jass is pressed up against the cage. Flacide has hold of a leg and is looking to drag Jass down to the mat. Jass avoids the attempt though and has circled away. We're back to striking at a distance.
Hugh Jass has stuffed three takedown attempts in the round now. That's going to take a lot out of Helio Flacide.
Jass throws a body punch but Flacide moves out of range.
The fight stays on the outside here - Flacide looks like he's thinking about clinching though.
Jass swings and misses with a hook to the body.
Jass ducks down and throws a hook to the body but Flacide moves away.
That's one minute gone in the round.
Flacide is looking to clinch but Jass is avoiding it.
Flacide tries to clinch there but Jass circles away.
Jass swung with a counter punch to the body but it didn't connect.
Flacide tries to clinch up.
Jass connects with a good right hand that stumbles Flacide. Flacide circles away out of range and recomposes himself.
Jass wings a very wild body shot but it does the job and lands to the midsection.
Jass lands a two punch combo.
Flacide is rocked!
Flacide gets clipped by a big right hand and goes down spinning to the canvas! Jass gets the back mount and begins to drop bombs on his rocked foe! Flacide is too out of it to defend against the strikes and the referee jumps in to save him from the beatdown!
Ladies and gentlemen, after 1:26 of round 2, we have a winner by way of TKO (Strikes). Hugh Jass!
|
|
|
|
|
|
|
|
|
|
|
|
|
|
|
|
|
|
|
|
|
|
|
| S |
C
A |
G |
S |
C
B |
G |
|
S |
C |
G |
|
energy
A | B |
|
hype
A | B |
|
pop
A | B |
|
mgr
A | B |
|
FIGHT
RATING
51% |
|
|
|
|
|
|
|
Undercard bout
|
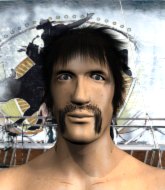
Coming up we have a lightweight MMA rules bout between Reece Robertson (ranked 3212 p4p, 4035 weight class) and Addy Shooter (ranked 399 p4p, 453 weight class). Shooter has chosen The Bees Knees By, Juice WRLD as his entrance music, which hasn't gone down very well with the crowd. Over to our ring announcer for the fighter introductions!
 |
|
 |
| 185 cm
20
167
3 - 5 - 0 |
|
182 cm
22
160
3 - 3 - 0 |
BJJ Blue Belt
Excellent boxer
Big right hand |
|
BJJ Blue Belt
Excellent MT
Solid chin |
|
| |
|
Ladies and gentlemen. This fight is 3 rounds, in the lightweight division.
Introducing the fighter to my left, fighting out of the red corner.
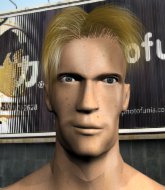
With a record of 3 - 5 - 0, fighting out of Los Angeles, Reece Robertson!
And introducing the fighter to my right, fighting out of the blue corner.
With a record of 3 - 3 - 0, fighting out of New York, Addy Shooter!
The judges for this bout are Dean Styles, Chad Campbell and Russell Pearce.
The bell rings for round one and we are underway!
Shooter misses with a head kick.
Shooter throws out a token jab with nothing on it.
Shooter throws a right hand that misses
and Robertson counters with a two punch combo.
Shooter misses with a lunging right hand
and Robertson counters with a series of strikes. Shooter will be more careful next time no doubt.
Robertson throws a nice hook to the body that draws an oooh from the crowd.
Robertson goes to the watering hole and comes back with a big thumbs up from the judges as he scores a three punch combo.
It looks like Addy Shooter has been cut.
Shooter throws a hard body shot but it just misses.
Shooter throws a hook but Robertson avoids it easily.
We've seen a great period of action over the last minute or so - credit to both fighters for going all out!
Shooter digs a good body shot into Robertson's ribs.
Shooter just misses with a punch to the body.
Robertson displaying good standup as he scores with a three punch combination.
Robertson moves out of range as Shooter strikes.
Robertson tries to counter by moving into the clinch but Shooter manages to circle out of the way.
Shooter throws an ugly left hook that misses
and Robertson counters with a good right hand that lands right on the jaw.
Shooter throws a head kick that misses and slips in the process. He scrambles back to his feet and the fighters circle.
That's one minute gone in the round.
Robertson lands the left hand.
A solid body kick from Robertson.
Shooter blocks a low kick nicely.
A big right from Shooter misses.
Robertson appears to be looking for a big counter.
Shooter throws a lazy right hand but Robertson sees it coming a mile off and sidesteps it easily.
Robertson walks into a straight right hand from Shooter.
Robertson misses with a wild combination.
Shooter waving his hands out in front of him, looking to distract Robertson.
Shooter misses with the combination.
Robertson throws a combination but it was largely blocked by Shooter.
A big right from Shooter misses.
That's two minutes gone in the round.
Shooter throws a head kick that misses
and Robertson makes him pay by landing a nice hook to the body before moving out of range.
Robertson ducks under a wild hook from Shooter.
Robertson misses with a wild combination.
This has been an exciting period of action!
Shooter throws a nice looking combination but Robertson bobs and weaves to avoid any damage.
We've been told by Robertson's head coaches at California Top Team that he's been working on his takedown defense in preparation for this fight.
Shooter throws out a token jab with nothing on it.
Robertson connects with a single shot there.
Shooter throws an ugly left hook that misses
and Robertson counters with a body kick.
Robertson feints a jab promting Shooter to slip. Robertson then demonstrates his capabilities by jabbing again. Shooter slips again and ducks right into an uppercut.
Robertson misses with a double jab.
Shooter throws a big shot that misses.
Robertson takes a jab right on the nose. That must have hurt but he shrugs his shoulders and looks to return the favor.
 It looks like Reece Robertson has been cut. It looks like Reece Robertson has been cut.
That's three minutes gone in the round.
Shooter swings wildly with a couple of big hooks
and Robertson counters with a nice kick to the body.
Robertson stooping low to avoid any incoming strikes and then lunges in with an uppercut come cross that lands flush.
Robertson connects with a right hand. Shooter shakes it off.
Robertson keeping a good distance there, avoiding the body shot.
Robertson clobbers Shooter with an overhand right that has the crowd gasping. That made a horrendous noise.
Shooter throws the left hand but Robertson avoids the punch easily.
Robertson tests Shooter's chin there with a solid looking shot.
Shooter missing with a left hand there. Robertson was out of range so wasted energy throwing that one.
Robertson tries to counter by clinching up but Shooter breaks away and moves out of range.
Shooter with a hook.
Shooter might want to mix his strikes up a bit more. He's just going for head shots at the moment and that can become a bit predictable.
Shooter punishes Robertson's body with a nice straight punch.
Shooter tries to land with a swinging hook to the body but Robertson was well out of range. Poor timing from Shooter.
Robertson swung with a counter right hand that didn't connect.
Addy Shooter seems to be the more aggressive standup fighter in this bout.
Robertson ducks under a wild hook from Shooter.
Robertson swung with a counter right hand that didn't connect.
The fans in attendance giving it up for the two fighters, who have really let it all hang out in the last minute or so!
Nice defenses there by Robertson.
That's four minutes gone in the round.
Robertson slips under a jab.
Robertson tries to counter by clinching up but Shooter breaks away and moves out of range.
Shooter throws an ugly left hook that misses
and Robertson finishes the little exchange by landing a big kick to the body.
Robertson connects with a lovely jab that went straight through the gap between Shooter's hands.
Robertson is working the combinations to good effect here.
Robertson uses some good footwork to avoid the body shot by Shooter.
Robertson feints and then cracks Shooter's leading leg with a nice low kick. He's obviously looking to slow Shooter down.
A swing and a miss from Shooter.
Robertson blocks a head kick by Shooter.
Robertson tries to counter by moving into the clinch but Shooter manages to circle out of the way.
Robertson with a nice calf kick.
Shooter throws a right hand that misses
and Shooter takes a counter punch right on the button for his troubles.
The crowd applaud the fighters' efforts here as the round comes to an end.
The fighters circling - Shooter throws out the jab but it was never going to land.
Robertson keeping a good distance there, avoiding the body shot.
Shooter throws a sloppy body shot
and Robertson counters with a stiff right hand.
And that is the end of the round. The fighters go back to their corners.
Reece Robertson dominated that round.
Both fighters have cut men working on them during the interval.
The minute break is over - no more time for sponges and pep talks - back to the action!
Shooter misses with an uppercut
and Robertson counters with a three punch combo that has Shooter backing up. Shooter nods at Robertson to acknowledge the strikes.
Robertson uses good head movement to avoid the hook from Shooter.
Robertson misses with a series of wild punches.
Shooter lets it all go there with a big combo counter but none of the punches connected.
Robertson steps to the side to avoid the strikes from Shooter.
Robertson throws a right and a left that both miss.
Shooter jabbing away but nothing is landing.
Robertson connects with a body shot that sends Shooter's belly button to the back.
Robertson getting the better of the striking in that exchange.
We've had a slow start to the round here - hopefully the action picks up.
Shooter throws a nice looking combination but Robertson bobs and weaves to avoid any damage.
Robertson is looking for a counter combo.
Shooter tries a switch kick but it misses it's target.
A quick step to the side and Robertson tries to counter with a shot to the body but it doesn't connect.
Shooter throws a looping overhand right but Robertson ducks down to avoid it.
Robertson throws a big counter combination but Shooter scrambles out of danger and avoids any damage.
Robertson lands an overhand right.
That's one minute gone in the round.
Robertson fails to land with the punch combination there - jab, cross, hook, miss, miss, miss.
Shooter takes a hook to the side of the head. I wonder if that's got his ears ringing.
Reece Robertson is winning the standup battle so far.
Robertson misses with the combination.
Robertson moves away from the strike by Shooter.
Both these guys seem content to just stand up and trade with each other but Shooter might want to think about changing up his gameplan a bit because over the course of the fight, Robertson has got the better of the exchanges.
Shooter misses with an uppercut
and Robertson counters with a one-two to the body.
Shooter is rocked!
Robertson batters Shooter with a massive right followed by a huge left! Shooter is out on his feet looking like a zombie as Robertson lands a final crushing right hand to drop Shooter to the mat with a gruesome thud! Robertson is running around like a mad man after that fight and for good reason!
Ladies and gentlemen, after 1:36 of round 2, we have a winner by way of KO (Strikes). Reece Robertson!
|
|
|
|
|
|
|
|
|
|
|
|
|
|
|
|
|
|
|
|
|
|
|
| S |
C
A |
G |
S |
C
B |
G |
|
S |
C |
G |
|
energy
A | B |
|
hype
A | B |
|
pop
A | B |
|
mgr
A | B |
|
FIGHT
RATING
64% |
|
|
|
|
|
|
|
Undercard bout
|
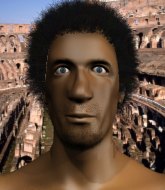
Coming up we have a bantamweight MMA rules bout between Antonio Bellavia (ranked 2081 p4p, 25049 weight class) and John James (ranked 131 p4p, 302 weight class). Antonio Bellavia has the better chin. Will he look to stand and bang today?
 |
|
 |
| 170 cm
26
134
6 - 0 - 0 |
|
185 cm
26
145
1 - 4 - 0 |
BJJ Purple Belt
Excellent boxer
Granite chin |
|
Good wrestler
Counter fighter
Powerful |
|
| |
|
Ladies and gentlemen. This fight is 3 rounds, in the bantamweight division.
Introducing the fighter to my left, fighting out of the red corner.
With a record of 6 - 0 - 0, fighting out of Rio de Janeiro, Antonio Bellavia!
And introducing the fighter to my right, fighting out of the blue corner.
With a record of 1 - 4 - 0, fighting out of Sydney, John James!
The judges for this bout are Franklyn Lucas, Anthony Taglia and Reed Andrews.
The bell rings for round one and we are underway!
Bellavia misses with a right hand
and James counters with a nice double leg into guard.
James drops back looking for a leg! Bellavia is in trouble here! The fighters roll with the hold and Bellavia manages to kick James off! James jumps back into Bellavia's guard.

Bellavia looking for a triangle here. James is fighting it but it looks tight! Bellavia pulls the arm across and this one won't last much longer! Nope, James is tapping out - this one is all over!
Ladies and gentlemen, after 0:26 of round 1, we have a winner by way of Submission (Triangle Choke). Antonio Bellavia!
|
|
|
|
|
|
|
|
|
|
|
|
|
|
|
|
|
|
|
|
|
|
|
| S |
C
A |
G |
S |
C
B |
G |
|
S |
C |
G |
|
energy
A | B |
|
hype
A | B |
|
pop
A | B |
|
mgr
A | B |
|
FIGHT
RATING
100% |
|
|
|
|
|
|
|
Undercard bout
|
Coming up we have a heavyweight MMA rules bout between Daniel Galarza (ranked 2370 p4p, 4500 weight class) and Jon Miocic (ranked 281 p4p, 482 weight class). Daniel Galarza has the edge in experience - let's see if he can make that count tonight.
 |
|
 |
| 200 cm
27
260
5 - 4 - 0 |
|
193 cm
25
240
0 - 0 - 0 |
BJJ Blue Belt
Solid Muay Thai
Granite chin |
|
BJJ Blue Belt
Solid Muay Thai
Determined |
|
| |
|
Ladies and gentlemen. This fight is 3 rounds, in the heavyweight division.
Introducing the fighter to my left, fighting out of the red corner.
With a record of 5 - 4 - 0, fighting out of Hilo, Daniel Galarza!
And introducing the fighter to my right, fighting out of the blue corner.
With a record of 0 - 0 - 0, fighting out of Los Angeles, Jon Miocic!
The judges for this bout are Alyssa Summers, Franklyn Lucas and Anthony Taglia.
The bell rings for round one and we are underway!
Galarza tries to clinch up but Miocic circles away and keeps his distance.
Miocic throws a hook to the body but it doesn't connect.
Miocic throws a couple of head shots and lands with the final one - a decent hook, which struck Galarza on the side of the head.
It looks like Daniel Galarza has been cut.
Miocic fakes a head shot and lands one to the body.
Galarza looks for a takedown but Miocic sprawls well.
Galarza throws a combination but it was largely blocked by Miocic.
Miocic appears to be waiting to throw a counter punch to the body.
Galarza tries to clinch up
and Miocic counters with a lovely straight right hand!
We've had a slow start to the round here - hopefully the action picks up.
Galarza takes a punch right to his stomach. That took the wind out of him momentarily.
A combination from Galarza does no damage.

Galarza drives through with a really nice takedown into side control.
We've seen a great period of action over the last minute or so - credit to both fighters for going all out!
Galarza tries for an arm triangle. That looks pretty tight to me. Is this one over!?! Possibly, maybe, no Galarza has let go of the choke. Obviously it wasn't as tight as we thought!
That's one minute gone in the round.

Miocic throws Galarza to one side and escapes!
Galarza looking to score a takedown here. Miocic is defending well but Galarza drives through and ends up in Miocic's guard.
Galarza wants to control from the top but Miocic keeps moving.
Miocic has butterfly guard. He's looking to stand up here. He pushes Galarza off him and springs to his feet nicely. The crowd applauds.
Galarza moves out of range of the strikes.
Miocic throws a hook to the body but it doesn't connect.
Miocic misses the shot to the body.
Miocic buckles his opponent's knee momentarily with a nice leg kick.
That's two minutes gone in the round.
Miocic ducks down and throws a hook to the body but Galarza moves away.
Wooooo! Give it up for these two warriors! They are putting on a show!
Galarza fails with an attempt to clinch.
A looping hook to the body misses from Miocic. Galarza does a little dance to reset his feet.
Miocic fakes a head shot and lands one to the body.
Miocic lands a nice looking body shot.
Miocic avoids the head kick by Galarza.
Miocic connects with a nice looking jab.
Miocic avoids the head kick by Galarza.
Good standup being displayed there by Miocic as he connects with a hook.
Miocic dips down and scores with a jab to the body.
Miocic tries to sprawl but Galarza drives through with a takedown into half guard.
Miocic looks like he's trying to stand up.
That's three minutes gone in the round.
Miocic is trying to escape back to his feet but Galarza uses the scramble to pass into side control.
Miocic is trying to get back to his feet.
Galarza decides to stand back up.
Galarza tries to clinch but Miocic moves out of range.
Miocic ducks low and lands a nice hook to the body of his opponent.
That's four minutes gone in the round.
Miocic slaps away a takedown attempt from Galarza, before circling back to the center of the mat.
A nice side step and Miocic releases a counter shot to the body, but it doesn't find it's home.
Miocic is throwing a lot of body shots here, looking to wear down Galarza rather than just go for the knockout.
Miocic clobbers Galarza with an overhand right that has the crowd gasping. That made a horrendous noise.
Nice shot lands for Miocic.
Miocic stooping low to avoid any incoming strikes and then lunges in with an uppercut come cross that lands flush.
Galarza avoids the body shot from Miocic.
Miocic keeps the fight standing with a nice sprawl.
That's three failed takedown attempts in the round for Daniel Galarza. That's going to take a lot out of him.
Miocic fakes high and swings low for a body shot but Galarza manages to avoid it.
Galarza swings for the body but Miocic moves out of range.
Miocic throws a big counter head kick but Galarza avoids it with no problem.
Miocic throws a shot to the body.
And that is the end of the round. The fighters go back to their corners.
Jon Miocic dominated that round.
The cut man is working on Daniel Galarza's cut.
Well, the break between rounds is over. Let's get back to the scrappin!
Miocic throws the left hand but Galarza avoids the punch easily.
Galarza tries to clinch but Miocic moves out of range.
Miocic throws a counter combo.
Miocic pulls out of a head kick attempt.
Galarza seem to be loading up, looking for a big counter.
Galarza scores with a nice takedown into half guard. Let's see what he's got on the ground.
Miocic has one foot on Galarza's thigh - he pushes off and manages to get back to his feet.
Donk. Miocic catches Galarza right on the button with a cross.
Miocic connects with a jab.
Galarza takes one on the chin but keeps coming.
This has been an exciting period of action!
Miocic scores with a jab to the body.
Miocic connects with a jab.
Daniel Galarza's cut is getting worse.
Galarza shoots in for a takedown. "Ole!" shouts Miocic as he jumps to the side.
Galarza closes the distance and presses his opponent up against the cage.
That's one minute gone in the round.
Galarza breaks the clinch and we return to the middle of the mat.
Galarza misses with a takedown attempt. He shot from a bit too far out.
Miocic misses with a wild body shot.
The fighters are starting to perspire pretty heavily.
Miocic connects with a body shot.
Miocic misses with a body shot.
Miocic fakes a head punch and goes low to the body. Nicely done.
Both fighters are absolutely exhausted here.
Galarza drops his hands momentarily and Miocic takes advantage with a crisp shot to the head.
Miocic lands with a right hand.
 Galarza is rocked! Galarza is rocked!
Miocic fakes the leg kick and throws a superman punch. It's knocked Galarza out cold! Brutal finish!
Ladies and gentlemen, after 1:56 of round 2, we have a winner by way of KO (Superman Punch). Jon Miocic!
|
|
|
|
|
|
|
|
|
|
|
|
|
|
|
|
|
|
|
|
|
|
|
| S |
C
A |
G |
S |
C
B |
G |
|
S |
C |
G |
|
energy
A | B |
|
hype
A | B |
|
pop
A | B |
|
mgr
A | B |
|
FIGHT
RATING
57% |
|
|
|
|
|
|
|
Undercard bout
|
Coming up we have a welterweight MMA rules bout between Jacob Fuisse (ranked 2461 p4p, 3273 weight class) and Paulo Mendes (ranked 321 p4p, 417 weight class). Mendes has chosen Future - Last Breath as his entrance music. Both fighters look fresh as a daisy as they make their way towards the cage.
 |
|
 |
| 185 cm
28
184
4 - 1 - 0 |
|
180 cm
20
186
2 - 0 - 0 |
Good wrestling
Brawler
Very quick |
|
Excellent grappler
Brawler
Granite chin |
|
| |
|
Ladies and gentlemen. This fight is 3 rounds, in the welterweight division.
Introducing the fighter to my left, fighting out of the red corner.
With a record of 4 - 1 - 0, fighting out of Los Angeles, Jacob Fuisse!
And introducing the fighter to my right, fighting out of the blue corner.
With a record of 2 - 0 - 0, fighting out of Los Angeles, Paulo Mendes!
The judges for this bout are John Roberts, Jonathan Paton and Lou da Vinci.
The bell rings for round one and we are underway!
Fuisse shoots in with a lovely double leg takedown. Mendes manages to land in full guard to minimise the damage.
Mendes is trying to control the position from the bottom.
Mendes has his hands on Fuisse's head, controlling the position.
Fuisse keeps in close for a moment and lands a decent shot to the side of Mendes's head.
Mendes is looking for a triangle but Fuisse pushes his legs off easily.
Fuisse scoring with some ground and pound.
Mendes is working actively off his back, looking to secure an arm or perhaps work for a triangle.
Fuisse is sitting in guard, working some ground and pound.
We've had a slow start to the round here - hopefully the action picks up.
Fuisse with a nice head shot there.
Mendes preventing the ground and pound from doing any damage.
The ref warns both fighters not to hold the cage as they work up against the meshing.
Mendes seems keen to control Fuisse's posture.
Mendes is working from a closed guard but he's struggling to control his opponent.
That's one minute gone in the round.
Fuisse scoring with punches to the head and body.
Mendes has his hands on Fuisse's head, controlling the position.
Fuisse in full guard, throwing the ground and pound. No damage this time.
Fuisse scores with a decent looking elbow strike.
Fuisse is looking to work some ground and pound but Mendes has wrist control.
Fuisse makes a bit of distance and scores with some ground and pound, still in guard.
Fuisse working from the guard for now, landing some ground and pound.
Mendes has a loose triangle. He'll be looking to tighten that up but Fuisse can see exactly what he's planning and manages to posture up and free himself.
Fuisse with a nice head shot there.
Fuisse postures up and lands a big shot to Mendes's brow.
Mendes working for a triangle but Fuisse defends it easily.
Fuisse lands a nice shot whilst sitting in his opponent's guard.
Fuisse has to be careful here, sitting in the guard of a superior BJJ player.
That's two minutes gone in the round.
Mendes working from the bottom, still in full guard. He's managed to get a loose triangle. Fuisse doesn't seem to be doing much to defend here, obviously he feels comfortable in the position. Fuisse manages to throw the legs off his shoulder and he's back into guard - no problem.
Fuisse in full guard, throwing the ground and pound. No damage this time.
Mendes trying to control the position.
Mendes wants to sweep but no luck.
Our spies down at at California Top Team inform us that Mendes has really been working on his submissions in the buildup to this fight. Will it pay off?
Fuisse is looking to work some ground and pound but Mendes has wrist control.
Fuisse cracks Mendes with a solid left hand.
Fuisse postures up and lands a big shot to Mendes's brow.
Mendes controls Fuisse momentarily but Fuisse frees himself.
Mendes wants to sweep here but Fuisse controlling him for the moment.
The fighters are pressed up against the cage, both looking to find a bit of space to work.
This has been an exciting period of action!
Fuisse keeps in close for a moment and lands a decent shot to the side of Mendes's head.
That's three minutes gone in the round.
Fuisse lands a couple of decent looking shots.
Fuisse postures up and scores with a shot to the body and a follow up elbow to the head.
Fuisse working from the guard for now, landing some ground and pound.
Fuisse keeps in close for a moment and lands a decent shot to the side of Mendes's head.
Fuisse drops back looking for a leg! Mendes is in trouble here! The fighters roll with the hold and Mendes manages to kick Fuisse off! Fuisse jumps back into Mendes's guard.
Mendes is looking for a guillotine. You can't force these things though and Fuisse defends well.
Fuisse trying to land body shots but he keeps hitting the mat.
Mendes utilising some decent striking defenses from the guard, preventing the ground and pound.
Fuisse works over Mendes with some ground and pound from guard.
Fuisse chips away with some ground and pound.
Fuisse loading up with the ground and pound but he's missing more than he's landing in this flurry.
That's four minutes gone in the round.
Fuisse lands a couple of decent looking shots.
Mendes avoiding any damage from the ground and pound.
Fuisse trying to land body shots but he keeps hitting the mat.
Fuisse working some strikes from top position.
Mendes bucks up whilst keeping hold of a body lock, managing to reverse the position. Now he's in top in Fuisse's guard.

Mendes working some strikes from top position.
Mendes preventing the sweep.
The crowd are loving this. Great action here.
Mendes loading up with the ground and pound but he's missing more than he's landing in this flurry.
Mendes works a leg free and moves into half guard.
Mendes wants to work for an arm triangle but Fuisse is really keeping half guard well and defending the submission attempt.
Fuisse slips a foot under and gets full guard. Nice work.
Mendes lands a nice shot whilst sitting in his opponent's guard.
Fuisse has his foot on Mendes's thigh. He's trying to push off and get in position for a triangle, I think. Mendes works his way back into a safe position though.
Fuisse has his foot on Mendes's thigh. He's trying to push off and get in position for a triangle, I think. Mendes works his way back into a safe position though.
Mendes wants to control from the top but Fuisse keeps moving.
And that is the end of the round. The fighters go back to their corners.
Jacob Fuisse dominated that round.
That's the end of the interval. I'm sure that seemed a lot quicker than a minute for our two fighters! Back to the action.
Good standup being displayed there by Mendes as he connects with a hook.
Fuisse shoots in for a takedown - he's clinched up with Mendes but Mendes pushes him off and we're back to square one.
Mendes looked like he wanted to counter with a punch but didn't throw it.
Mendes swings wildly with a right hand that was never going to find it's target.
Fuisse slips under a jab from Mendes.
A jab from Mendes does it's job there.
Fuisse is rocked!
Mendes shakes his hands by his side, trying to relax. Fuisse takes his eyes off the ball for a moment - Mendes sees the opportunity and cracks him with a massive hook! Fuisse bends double and collapses on top of himself - he's out! The crowd are going absolutely nuts! Wow, what a knockout!
Ladies and gentlemen, after 0:29 of round 2, we have a winner by way of KO (Punch). Paulo Mendes!
A very excited looking Paulo Mendes rambled incoherently for about 5 minutes post fight about how awesome he is. It was kinda funny for a while but then everyone got annoyed.
|
|
|
|
|
|
|
|
|
|
|
|
|
|
|
|
|
|
|
|
|
|
|
| S |
C
A |
G |
S |
C
B |
G |
|
S |
C |
G |
|
energy
A | B |
|
hype
A | B |
|
pop
A | B |
|
mgr
A | B |
|
FIGHT
RATING
41% |
|
|
|
|
|
|
|
Co-main event
|
Coming up we have a light heavyweight MMA rules bout between Toti Rotiz (ranked 1719 p4p, 1876 weight class) and Buzz Williamson (ranked 272 p4p, 299 weight class). Rotiz comes to the cage accompanied by Southtown . Buzz Williamson will no doubt be trying to keep this one on the feet, where he has a distinct advantage.
 |
|
 |
| 195 cm
29
215
8 - 8 - 0 |
|
182 cm
22
200
6 - 4 - 0 |
Good wrestling
Solid boxing
Very quick |
|
BJJ Purple Belt
Excellent boxer
Good gas tank |
|
| |
|
Ladies and gentlemen. This fight is 3 rounds, in the light heavyweight division.
Introducing the fighter to my left, fighting out of the red corner.
With a record of 8 - 8 - 0, fighting out of Los Angeles, Toti Rotiz!
And introducing the fighter to my right, fighting out of the blue corner.
With a record of 6 - 4 - 0, fighting out of Montreal, Buzz Williamson!
The judges for this bout are Bruno Lombardi, Anthony Taglia and John Roberts.
The bell rings for round one and we are underway!
Williamson misses with a double jab.
Williamson misses with a wild body shot.
Williamson lands an overhand right.
Rotiz misses with a hook.
Rotiz throws an overhand right that lands on Williamson's shoulder, as Williamson tries to avoid the shot.
Williamson looks more muscular than last time we saw him. He must have been on the weights.
Toti Rotiz seems to be the more aggressive standup fighter in this bout.
Rotiz swinging wildly here.
Williamson closes the distance and lands a one-two.
It looks like Toti Rotiz has been cut.
Rotiz feints a straight left to the body, then turns around with a flashy move and hits Williamsons jaw with a dramatic spinning back fist!
Williamson fails to land with the punch combination there - jab, cross, hook, miss, miss, miss.
Rotiz throws a nice hook to the body that draws an oooh from the crowd.
This has been an exciting period of action!
Rotiz misses with a looping left.
Williamson throws a two punch combo that lands nicely.
Williamson slips a straight right by Rotiz.
Rotiz fakes a jab and then connects with a hook.
Rotiz misses with a looping right.
Williamson looks to land a combination but Rotiz avoids it well.
A counter left hand to the body from Rotiz misses its target.
That's one minute gone in the round.
Williamson avoids a punch combination nicely.
Rotiz scores with a three punch combo!
Williamson misses the shot to the body.
Rotiz misses with a wild body shot.
A countering left hand to the body from Williamson misses.
Williamson looks to land a combination but Rotiz avoids it well.
Williamson walks into a stiff left hand from Rotiz.
Rotiz throws a series of punches but Williamson avoids them all with ease.
Williamson unleashes a big counter combination but Rotiz bobs and weaves and avoids any damage.
Rotiz pushing out the jab but it's not landing.
A jab from Rotiz misses.

Oooh a lovely combination from Rotiz sends Williamson down but not out. Rotiz dives into side control looking to finish.
Williamson is rocked!
The crowd are loving this. Great action here.
Williamson is trying to stand back up. He's worked his way up against the cage but Rotiz has just dragged him back down to the mat.
Williamson is still in real trouble! Can Rotiz finish him?
Rotiz lands a few punches from side control.
Rotiz working the ground and pound.
Williamson manages to land a sweep and he's now on top! Lovely Jiu Jitsu!
Rotiz wants to get back to his feet.
Williamson trying to mount his opponent but Rotiz defends it.
That's two minutes gone in the round.
Rotiz pushes Williamson off looking to stand but Williamson dives back in and keeps control.
Williamson seems to have recovered his senses.

Williamson decides to stand up.
Rotiz has taken the fight to the clinch.

Williamson manages to break the clinch.
Rotiz gets cracked with a nice right hand there by Williamson.
Rotiz looks to score with a jab to the body but Williamson is just out of range.
Williamson looked like he wanted to counter with a punch but didn't throw it.
Rotiz misses the body punch
and Rotiz takes a counter punch right on the button for his troubles.
Williamson throws a right and a left that Rotiz avoids nicely.
Williamson misses the shot to the body.
Williamson keeps the fight on the outside.
Rotiz darts in and out, connecting with a jab.
Rotiz looks to score with a jab to the body but Williamson is just out of range.
Williamson throws out a counter right but Rotiz avoids it with no problem.
That's three minutes gone in the round.
Williamson rushes forward with a series of wild hooks but Rotiz moves out of range and avoids them all easily.
Williamson ducks under an overhand right and circles away with a smile on his face.
Rotiz misses with a series of wild punches.
Williamson scores with a nice head shot.
Rotiz scores with a jab to the head.
Rotiz scores with a punch to the gut of his opponent.
Williamson slips a jab from Rotiz.
Rotiz lands a jab to the nose.
Rotiz looks to have improved his striking defense since last time we saw him fight.
The fighters circling - Rotiz throws out the jab but it was never going to land.
Williamson throws a combination but comes up with nothing but fresh air.
This fight brought to you by 5M nutrition - it's mmmmm tasty. Nice jab by Rotiz.
Rotiz throws a jab to the body, straight down the pipe. Boom. That sent Williamson stumbling backwards but he manages to regain his composure quickly.
The fans in attendance giving it up for the two fighters, who have really let it all hang out in the last minute or so!
Rotiz throws an overhand right from the outside, which connects and sends Williamson stumbling backwards into the cage! Williamson bounces back off the cage towards Rotiz, who cracks him with a two punch combination that drops him to his knees! Rotiz lands two more shots before the referee has chance to intervene - what a finish! Rotiz celebrates with his corner as the crowd cheer loudly.
Ladies and gentlemen, after 3:57 of round 1, we have a winner by way of TKO (Punches). Toti Rotiz!
In his post fight interview, Toti Rotiz started talking himself up. Luckily his charisma kept the crowd on side and gave him a good reception.
|
|
|
|
|
|
|
|
|
|
|
|
|
|
|
|
|
|
|
|
|
|
|
| S |
C
A |
G |
S |
C
B |
G |
|
S |
C |
G |
|
energy
A | B |
|
hype
A | B |
|
pop
A | B |
|
mgr
A | B |
|
FIGHT
RATING
72% |
|
|
|
|
|
|
|
Main event
|
Coming up we have a lightweight MMA rules bout between Brandon Cillian (ranked 1258 p4p, 2010 weight class) and Homas Oleman (ranked 181 p4p, 270 weight class). Homas Oleman told me before the fight that he's been watching a lot of DVDs so let's see if that helps him in this one! I can't wait to find out!
 |
|
 |
| 178 cm
21
165
8 - 4 - 0 |
|
177 cm
27
155
3 - 1 - 0 |
BJJ White Belt
Excellent boxer
Cardio machine |
|
Decent wrestler
Excellent MT
Solid chin |
|
| |
|
Ladies and gentlemen. This fight is 5 rounds, in the lightweight division.
Introducing the fighter to my left, fighting out of the red corner.
With a record of 8 - 4 - 0, fighting out of Las Vegas, Brandon Cillian!
And introducing the fighter to my right, fighting out of the blue corner.
With a record of 3 - 1 - 0, fighting out of Montreal, Homas Oleman!
The judges for this bout are Reed Andrews, Alyssa Summers and Russell Pearce.
The bell rings for round one and we are underway!
Oleman lands with a right hand.
Cillian dodges the punch combination from Oleman.
Oleman takes one on the chin but seems OK.
Cillian lands a powerful looking uppercut that connected with his opponent's jaw.
Oleman bobs and weaves well there to avoid the strikes.
Cillian throws a jab when Oleman was well out of range.
Oleman rushes forward with a series of wild hooks but Cillian moves out of range and avoids them all easily.
Cillian is looking for a counter combo.
Oleman uses decent footwork to sidestep a right hand from Cillian.
The fighters circle momentarily. Oleman darts into range and connects with a nice straight punch.
Cillian throws a good cross that connects.
Oleman fails with an attempt to clinch.
Cillian slips under a jab.
The fans in attendance giving it up for the two fighters, who have really let it all hang out in the last minute or so!
Cillian blocks a jab.
Some wild striking there from Cillian.
That's one minute gone in the round.
Oleman throws an overhand right that lands on Cillian's shoulder, as Cillian tries to avoid the shot.
An attempted straight right counter from Cillian misses the target.
Oleman connects nicely with a jab. Noted by the judges no doubt.
Oleman displays some good footwork, moving neatly out of range as Cillian throws out the jab.
Oleman wants to clinch but Cillian slips to the side
and Cillian makes him pay by landing a nice hook to the body before moving out of range.
Oleman uses good footwork to avoid the strikes from Cillian.
Oleman swings away with a counter right hand but no contact made.
Cillian throws a shot from downtown. Oleman moves away and avoids it.
Oleman looks to clinch
letting Cillian counter with a right hand.
Cillian is really head hunting here, hardly looking to strike to the body at all.
Oleman tries to clinch up
and Cillian counters with a nice uppercut.
Oleman fails with an attempt to clinch.
Oleman clobbers Cillian with an overhand right that has the crowd gasping. That made a horrendous noise.
Oleman moves away from the strike by Cillian.
And an attempted straight right on the counter from Oleman! But no joy.
Oleman throws a big shot that misses.
Cillian is looking to counter punch.
Cillian showing good head movement there, avoiding the strikes from Oleman.
Oleman has tried to improve his agility in the runup to this fight.
That's two minutes gone in the round.
Oleman is looking to clinch.
Cillian throwing a counter right hand but Oleman manages to avoid it.
Cillian throws a hook but Oleman blocks it.
This has been an exciting period of action!
Cillian tests Oleman's chin there with a solid looking shot.
Cillian lands a pitter patter jab to the forehead of his opponent.
Cillian works his jab well there, keeping his opponent at a distance.
Cillian misses with a low kick as Oleman jumps back.
Cillian looks to score with a jab to the body but Oleman is just out of range.
Cillian takes one on the button.
Oleman tries to clinch up
and Cillian counters with a quick right hand to the jaw.
Oleman misses with a looping right.
Cillian takes one on the button.
It looks like Brandon Cillian has been cut.
That's three minutes gone in the round.
Cillian throws an uppercut from half a mile away. Oleman sees it coming and avoids it easily.
Cillian swings wildly with a right hand that was never going to find it's target.
And Oleman tries to counter it with a takedown but Cillian pushes his down on his head and steps out.
Sloppy strikes from Cillian. Those never looked like landing.
Oleman takes a jab on the nose. He smiles like he loves it and keeps coming.
Oleman misses with a series of wild punches.
A nice combination there by Oleman.
Cillian keeps his opponent at a distance with a nice jab.
Oleman slips a jab from Cillian.
Cillian lands the left hand.
Oleman wants to clinch but Cillian slips to the side
and Cillian counters with a lovely straight right hand!
Cillian definitely looks more muscular than last time we saw him fight.
The crowd are loving this. Great action here.
Oleman will need to tighten up his combinations if he doesn't want to gas himself out, swinging at thin air.
That's four minutes gone in the round.
Cillian connects with a crisp jab.
Oleman scores with a one two! Cillian had his feet all tangled up there and couldn't avoid the strikes.
Oleman falls off balance throwing a combination
letting Cillian counter with a right hand.
It looks like Homas Oleman has been cut.
Cillian lands a head shot.
Cillian scores with a nice one two combo and darts back out of range to avoid anything coming in the opposite direction.
Oleman lands a jab to the head.
Jab, jab by Cillian - just one landing.
Cillian throws a big shot that misses.
Oleman throws an off balance right hand
and Cillian counters with a lovely straight right hand!
The crowd applaud the fighters' efforts here as the round comes to an end.
Cillian misses with an uppercut.
Cillian throws a looping overhand right but Oleman ducks down to avoid it.
Oleman appears to be waiting to throw a counter punch to the body.
Cillian misses with an uppercut. Oleman saw that one coming.
And that is the end of the round. The fighters go back to their corners.
Brandon Cillian dominated that round.
Both fighters have cut men working on them during the interval.
That's the end of the round. The referee orders the cornermen out of the cage so we can get back down to business.
Cillian closes the distance and lands a one-two.
Oleman tries to clinch up but Cillian circles away and keeps his distance.
Homas Oleman seems to be the more aggressive standup fighter in this bout.
Cillian on the wrong end of a nice jab.
Oleman ducks under an overhand right and circles away with a smile on his face.
Brandon Cillian is winning the standup battle so far.
Cillian keeps the fight on the outside.
Oleman looks to score with a combo but nothing lands.
Cillian dodges the punch combination from Oleman.
Oleman doesn't manage to clinch there - Cillian circles away.
Oleman avoids a punch combination nicely.
We've had a slow start to the round here - hopefully the action picks up.
Cillian waving his hands out in front of him, looking to distract Oleman.
Oleman misses with the combination.
Cillian uses good head movement to avoid the hook from Oleman.
Cillian throwing a counter right hand but Oleman manages to avoid it.
We are yet to see a takedown attempt from Oleman in the fight. On paper you would think he is the more dominant ground fighter so let's see if these unusual tactics pay off.
That's one minute gone in the round.
Cillian throws a series of strikes that have Oleman backpedaling.
Cillian scores with a jab. Oleman acknowledges it with a nod of the head.
Oleman is rocked!
Cillian misses the jab.
Oleman changes levels for a counter takedown but doesn't follow through with his attempt.
Cillian moves out of range as Oleman strikes.
Oleman tries to grapple but his opponent circles
and Cillian connects with a straight left hand counter down the middle.
Cillian lands a right hook to the body.
Oleman takes a jab right on the nose. That must have hurt but he shrugs his shoulders and looks to return the favor.
Both these guys seem content to just stand up and trade with each other but Oleman might want to think about changing up his gameplan a bit because over the course of the fight, Cillian has got the better of the exchanges.
Decent striking displayed by Cillian there.
Oleman is still on wobbly legs! Can Cillian finish him?
Oleman has a pretty nasty looking mouse under his right eye.
Oleman lands a nice looking body shot.
Oleman seems to have recovered his senses.
We've seen a great period of action over the last minute or so - credit to both fighters for going all out!
Nice uppercut lands for Cillian. That snapped Oleman's head back.
Oleman tries to clinch but Cillian is having none of it.
Oleman takes a solid shot to the body. That one hurt him but he's trying not to show it.
That's two minutes gone in the round.
Cillian shakes his hands off, looking to compose himself, but takes a jab to the jaw whilst he does it.
Cillian is really dominating this fight. Is there anything that Oleman can do to turn this around?
Cillian scores with a hook.
Oleman takes a jab right on the kisser.
Oleman showing good head movement there, avoiding the strikes from Cillian.
Cillian keeps the fight on the outside.
Oleman tries to clinch up but Cillian circles away and keeps his distance.
Oleman tries to close the distance and clinch up but Cillian swats him away and circles back towards the center.
Oleman moves in looking to clinch but Cillian pushes him off.
Oleman slips a straight right by Cillian.
Cillian misses with a straight left.
Oleman is looking to take this fight into the clinch.
Oleman throws a combination but comes up with nothing but fresh air.
That's three minutes gone in the round.
Cillian tries to keep at a distance but Oleman has taken the fight into the clinch.
Cillian wants to push off and get back to the center of the mat but Oleman has him pressed against the cage.
Cillian breaks the clinch.
Oleman darts in and clinches Cillian up against the cage.
Cillian has had enough of the clinch and is looking to separate.
Oleman struggles to land a body shot inside as Cillian controls his hands.
Cillian taking a breather.
Oleman letting Cillian take a breather here.
Cillian wants to break free. God knows he wants to breaaaak freeee.
An uppercut on the inside fails to land for Cillian.
Cillian lands on the inside with an uppercut.
That's four minutes gone in the round.
Cillian tries to throw a body punch but Oleman avoids it by throwing Cillian back against the cage.
Cillian misses with some punches.
A body shot lands from Oleman.
Oleman keeps the fight in the clinch, despite Cillian's efforts to push away.
A head punch blocked on the inside by Oleman.
Cillian tried to land a shot to the body but connects with Oleman's elbow.
Cillian misses with a short punch on the inside.
Cillian lands a hook to the body. It's hard to tell if that hurt Oleman or not.
Oleman tries to work over Cillian's body with a swooping hook but it only glances the target.
Cillian breaks from the clinch.
Oleman lands a jab to the nose.
Oleman misses with a left hand
and Cillian counters nicely by changing levels and landing a hook to the body.
Oleman tries to grapple but his opponent circles
and Cillian counters with a straight right hand.
And that is the end of the round. The fighters go back to their corners.
Brandon Cillian dominated that second round.
Both fighters have cut men working on them during the interval.
That's the end of the interval. I'm sure that seemed a lot quicker than a minute for our two fighters! Back to the action.

Cillian ducks right into an uppercut from Oleman.
Cillian throws a body punch but Oleman moves out of range.
Oleman falls off balance throwing a combination
and Cillian counters with a good right hand that lands right on the jaw.
A cross from Cillian lands.
Oleman thuds a left hand into Cillian's body.
Cillian connects with a lovely right hand, straight down the pipe.
Oleman moves to clinch but Cillian breaks away
and Cillian counters with a nice uppercut.
Oleman slips a jab from Cillian.
We've had a slow start to the round here - hopefully the action picks up.
Oleman misses the jab.
A little feinted left hand from Cillian on the counter but he doesn't commit to it.
A cross from Oleman lands.
Cillian throws a jab when Oleman was well out of range.
Some wild striking there from Oleman.
That's one minute gone in the round.
Oleman closes the distance looking to clinch
and Cillian connects with a straight left hand counter down the middle.
Cillian ducks under an overhand right and circles away with a smile on his face.
Cillian fakes low and throws an overhand right that catches Oleman on the side of the head.
Cillian scores with a jab to the jaw of his opponent.
Oleman lunges in with swinging rights and lefts but Cillian circles away quickly and effectively.
Cillian swings for the body but Oleman moves out of range.
Some wild striking there from Oleman.
Oleman is looking to clinch but Cillian is avoiding it.
Oleman tries to clinch up against the cage, rushing in to close the distance. Cillian manages to break the clinch and circles back to the middle of the mat.
Oleman is looking to take this fight into the clinch.
That's two minutes gone in the round.
Cillian pivots, looking for a leg kick but Oleman is out of range and Cillian settles back down.
Oleman wants to clinch
and Cillian counters with a straight punch to the midsection.
Cillian throws a hook to the body but it doesn't connect.
Oleman tries to clinch but is not successful on this occasion.
Cillian was looking to counter that move with a punch but didn't quite pull the trigger.
Cillian works Oleman's body with a nice hook.
Cillian bobs and weaves and unloads with a good uppercut.
We've seen a great period of action over the last minute or so - credit to both fighters for going all out!
Oleman throws a lazy right hand but Cillian sees it coming a mile off and sidesteps it easily.
Oleman tries to close the distance and clinch but Cillian swats him to one side with an open hand palm strike and circles away.
Cillian scores with a hook.
Cillian throws out a loose jab but Oleman uses good head movement to avoid it.
Oleman throws a right hand that misses
and Cillian counters with a quick right hand to the jaw.
Oleman throws a left and a right that both miss
and Cillian cracks him with a counter punch right on the button.
That's three minutes gone in the round.
Cillian throws a one two combo.
Oleman closes the distance looking to clinch
and Cillian counters with a straight right hand.
Oleman throws a poor cross that misses
and Cillian scores with a counter punch that sends Oleman to the canvas! Cillian smells blood - he's punishing Oleman with more strikes and the ref has stopped it! Oleman has no idea where he is - he's tackled the ref... oh dear, poor guy, the crowd is in hysterics!
Ladies and gentlemen, after 3:24 of round 3, we have a winner by way of TKO (Strikes). Brandon Cillian!
|
|
|
|
|
|
|
|
|
|
|
|
|
|
|
|
|
|
|
|
|
|
|
| S |
C
A |
G |
S |
C
B |
G |
|
S |
C |
G |
|
energy
A | B |
|
hype
A | B |
|
pop
A | B |
|
mgr
A | B |
|
FIGHT
RATING
62% |
|
|
|
|
|
|
|
|
|
|
